> ## Documentation Index
> Fetch the complete documentation index at: https://io.net/docs/llms.txt
> Use this file to discover all available pages before exploring further.
# Deploy VM on Demand
> Instantly deploy GPU accelerated virtual machines designed for AI and ML workloads. Configure, launch, and manage your compute VMs. CPUs are included with every instance.
**VM on Demand** provides a seamless way to deploy fully equipped virtual machines optimized for AI and machine learning workflows. Designed for data scientists, researchers, and builders, it enables you to launch high-performance GPU or CPU-powered environments with a few simple clicks.
You can scale resources as your workloads grow, monitor performance, and manage deployments, all through an intuitive interface. Whether you are training deep learning models, running data pipelines, or testing ML prototypes, **VM on Demand** delivers a fast, reliable, and frictionless compute experience.
## Quick Start:
1. Click **Deploy Virtual Machine** on the **Home** tab.
2. Choose your **Processor**.
3. Configure your **Virtual Machine**.
4. Monitor your deployment details in the sidebar.
5. Once the minimum requirements are met, review and deploy your cluster.
6. Start using your **Virtual Machine**.
7. View and manage your virtual machines in the **Virtual Machine** tab.
## Deploying Clusters
### 1. Getting Started
To begin, click the **Deploy** button in the **Virtual Machine** row on the **Home** tab of the io.net Cloud platform.
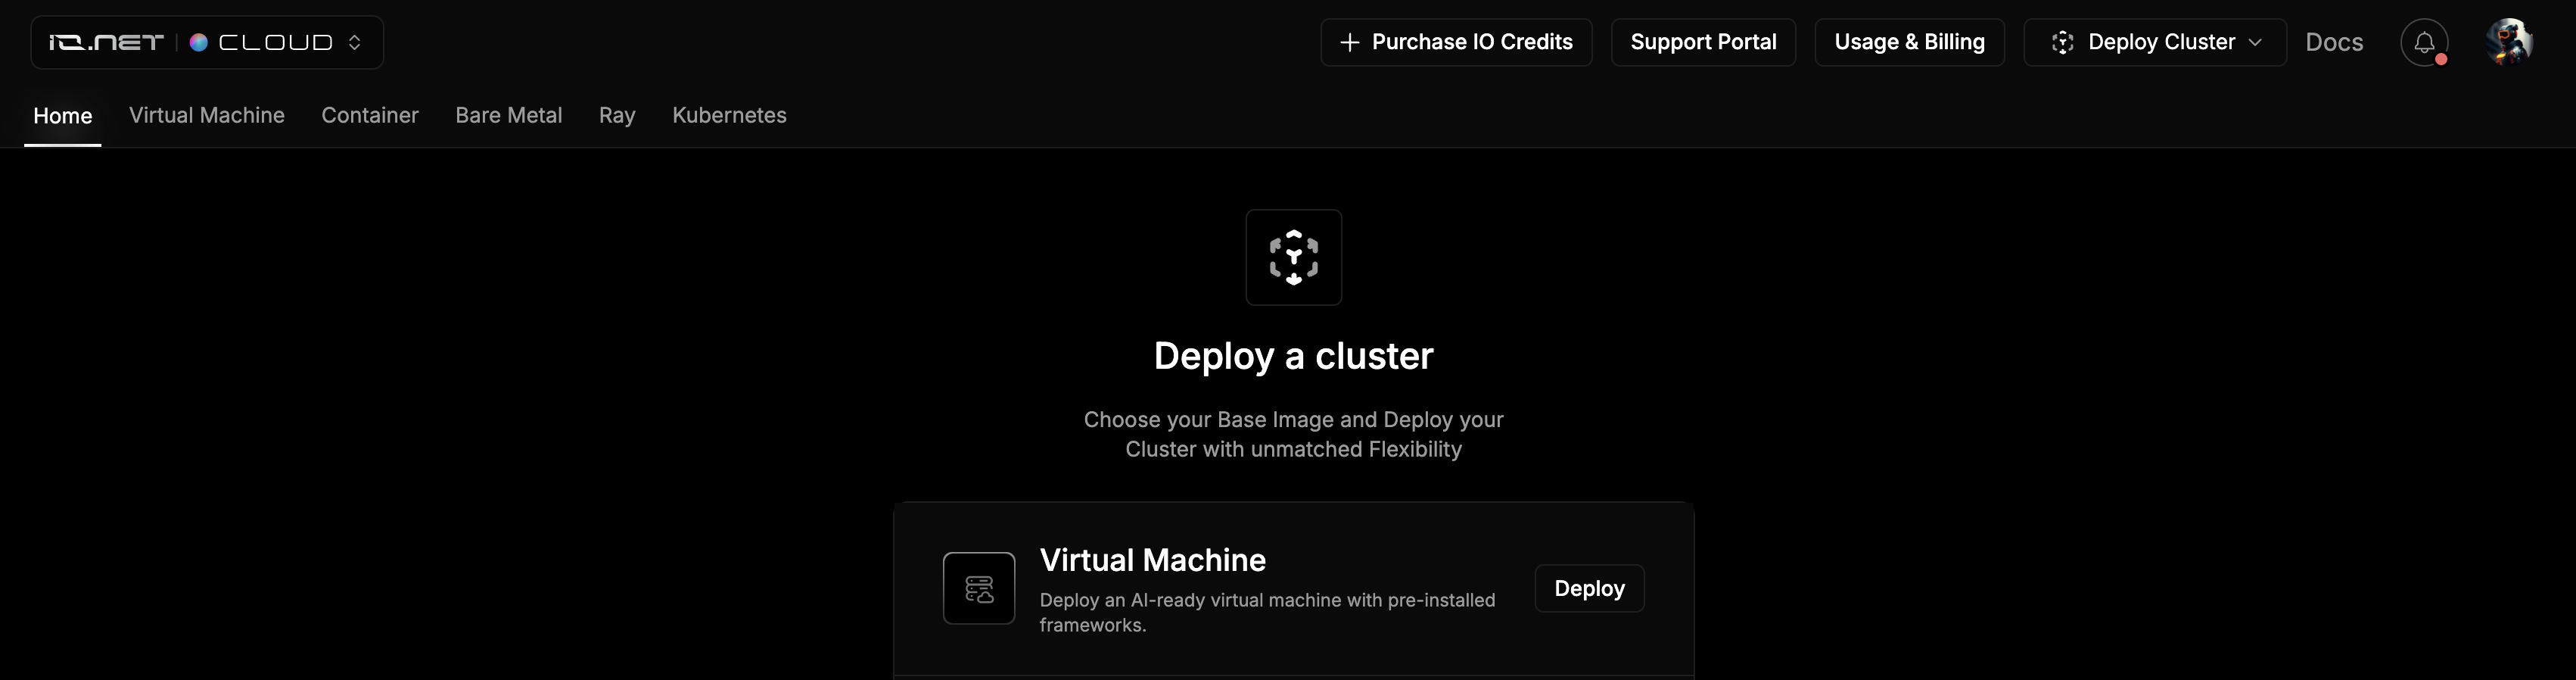 You can also open the **Virtual Machine** tab directly and select **Deploy Virtual Machine** to start a new deployment.
 ### 2. Select your Virtual Machine Processor
Choose a processor based on your requirements. Each card displays its specifications, including:
* *Device Availability*
* *Price*
* *VRAM per card*
* *Storage*
* *Supplier*
* *Location*
### 2. Select your Virtual Machine Processor
Choose a processor based on your requirements. Each card displays its specifications, including:
* *Device Availability*
* *Price*
* *VRAM per card*
* *Storage*
* *Supplier*
* *Location*
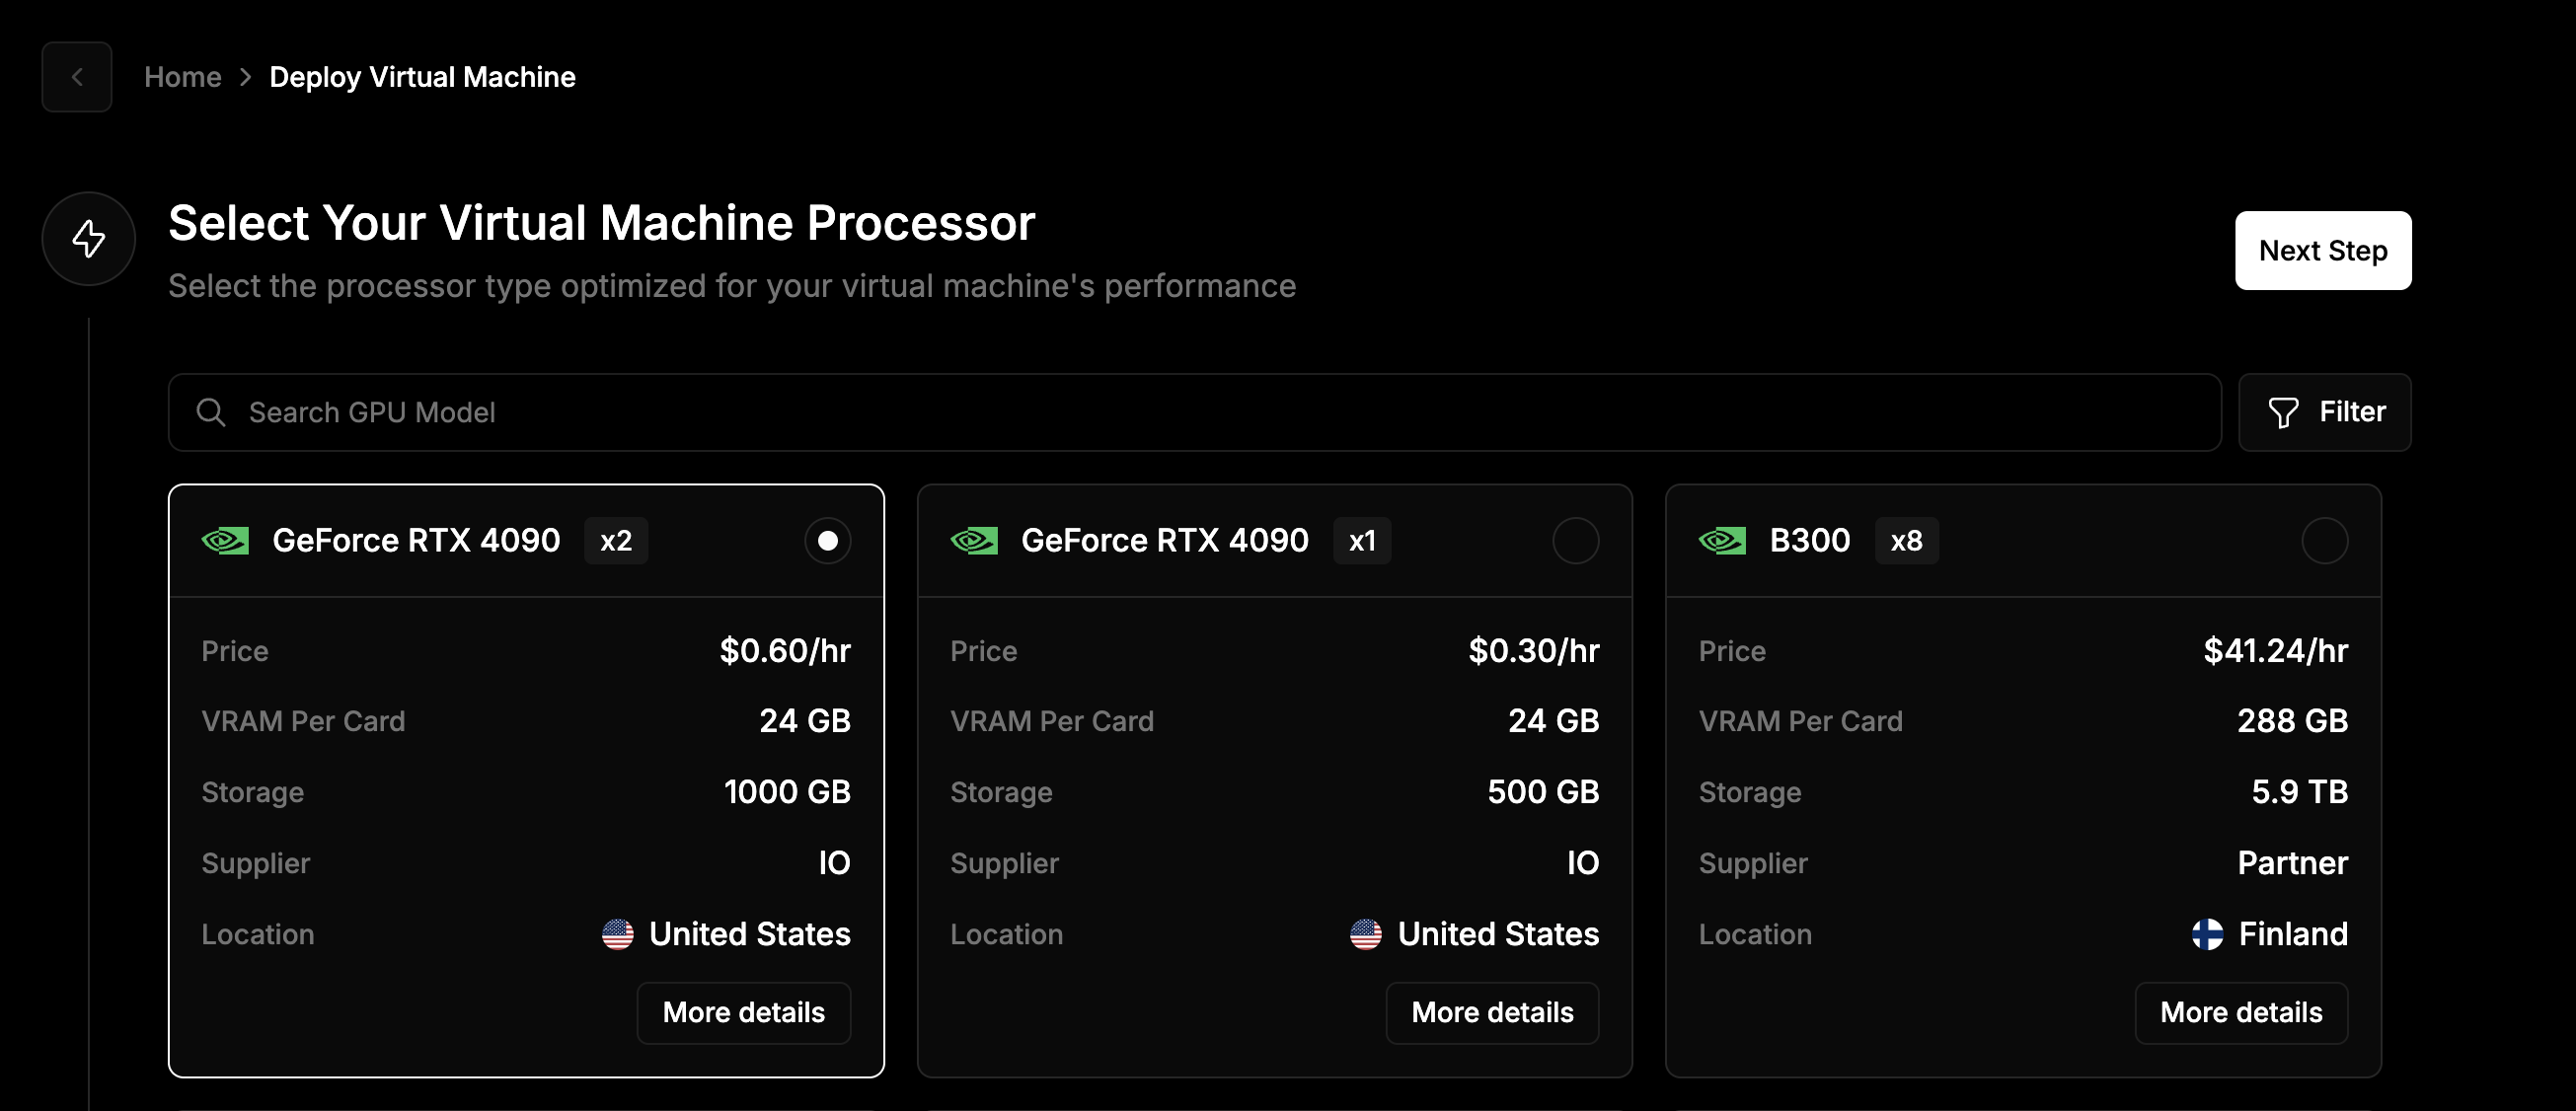 To view detailed technical information, click **More details**. This will display additional specifications such as interconnect technology, NVLink support, memory, and the number of virtual CPUs (vCPUs).
You can refine your selection using the **Search GPU Model** field or by applying filters. Click **Filter** to filter by:
* *GPU Family*
* *Region*
* *Supplier*
* *GPU Memory*
* *CPU Cores*
* *Device Memory*
* *Storage*
You can apply these filters individually or in combination.
To view detailed technical information, click **More details**. This will display additional specifications such as interconnect technology, NVLink support, memory, and the number of virtual CPUs (vCPUs).
You can refine your selection using the **Search GPU Model** field or by applying filters. Click **Filter** to filter by:
* *GPU Family*
* *Region*
* *Supplier*
* *GPU Memory*
* *CPU Cores*
* *Device Memory*
* *Storage*
You can apply these filters individually or in combination.
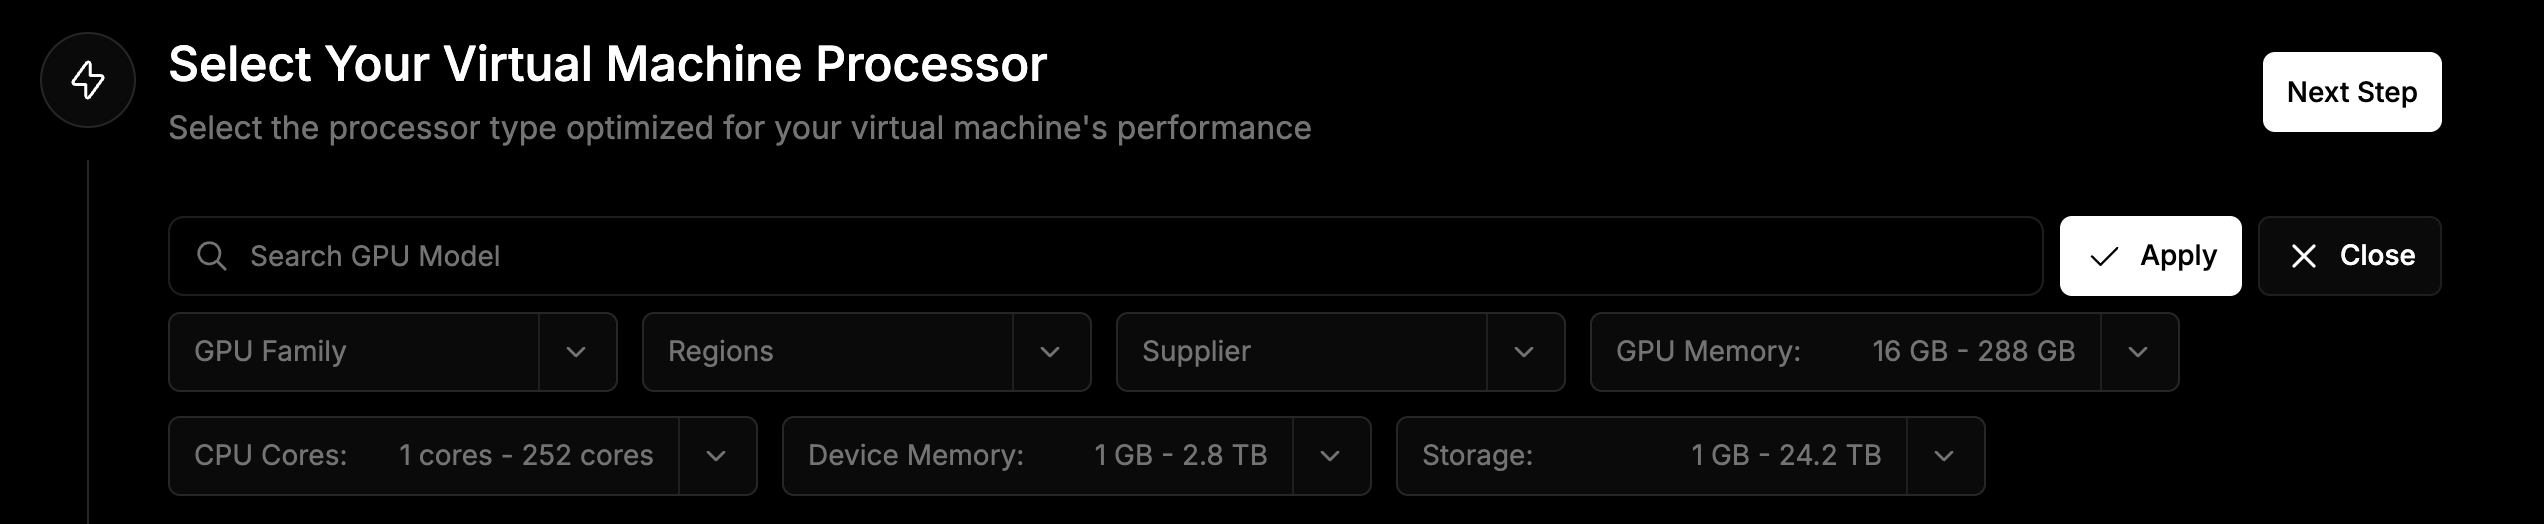 After selecting your Virtual Machine Processor, click **Next Step** to continue.
### 3. Configure Environment and SSH Keys
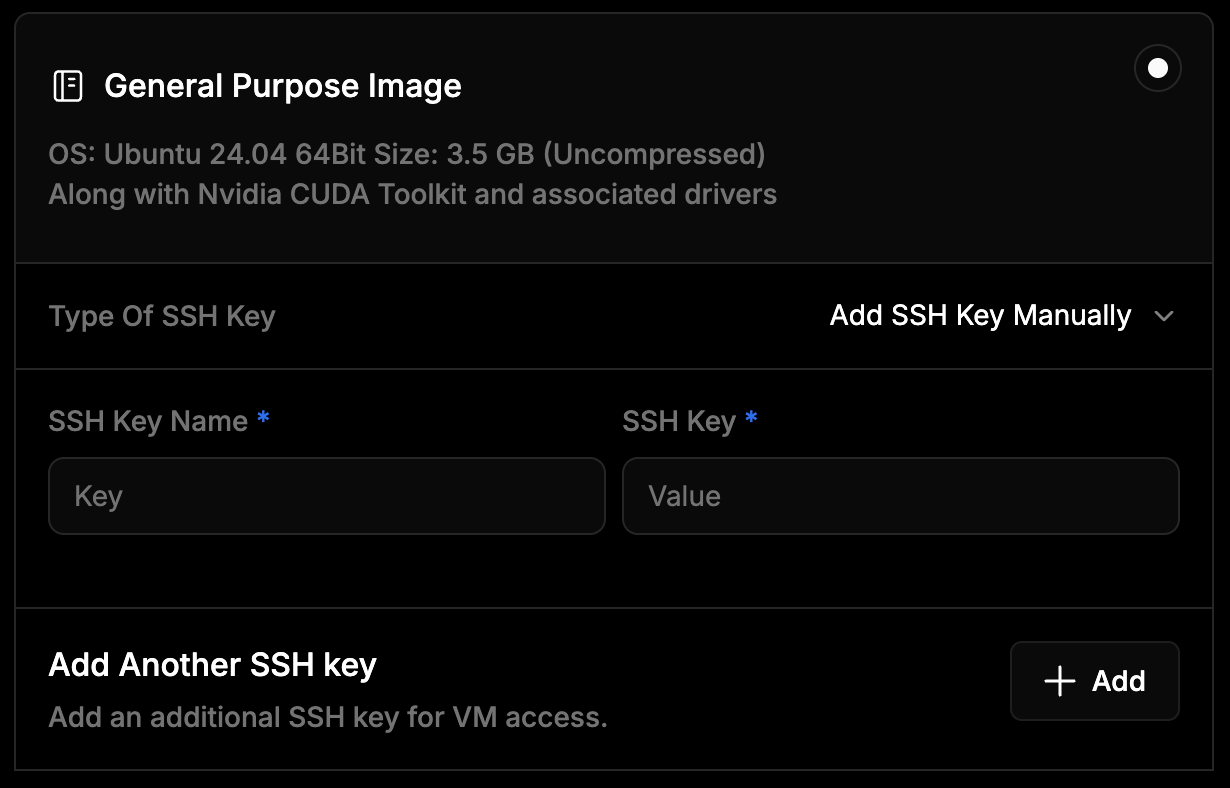
Set up your environment and link SSH Keys for secure access. You can choose between two image types:
Partner-provided clusters include a preloaded image that cannot be changed.
To choose a specific image, select a processor supplied by **io.net**.
The **General Purpose Image** provides a clean, flexible foundation for building any type of compute environment.
***Specifications:***
* **OS:** Ubuntu 24.04 (64-bit)
* **Size:** 3.5 GB (uncompressed)
* **Includes:** CUDA Toolkit and drivers
* **Ideal for:** Users who prefer to fully customize their development environment and software stack.
After selecting your Virtual Machine Processor, click **Next Step** to continue.
### 3. Configure Environment and SSH Keys
Set up your environment and link SSH Keys for secure access. You can choose between two image types:
Partner-provided clusters include a preloaded image that cannot be changed.
To choose a specific image, select a processor supplied by **io.net**.
The **General Purpose Image** provides a clean, flexible foundation for building any type of compute environment.
***Specifications:***
* **OS:** Ubuntu 24.04 (64-bit)
* **Size:** 3.5 GB (uncompressed)
* **Includes:** CUDA Toolkit and drivers
* **Ideal for:** Users who prefer to fully customize their development environment and software stack.
 The **Data Science Image** provides a ready-to-use environment for machine learning, artificial intelligence, and data analytics workloads. It comes fully configured with GPU acceleration and essential data science tools, allowing you to begin experimentation and model development immediately without additional setup.
***Specifications:***
* **OS:** Ubuntu 24.04.2 LTS
* **Includes:**
* Python 3.12
* Conda 25.7.0
* CUDA 12.1
* RAPIDS 25.6.0
* **Ideal for:**
* Building and training deep learning or machine learning models using GPU acceleration.
* Analyzing and processing large datasets with GPU-accelerated data frames.
* Running distributed computing tasks with frameworks such as **Ray**.
* Developing, visualizing, and testing AI workflows directly from **Jupyter Notebooks**.
[View full image specification →](/guides/clouds/data-science-image-full-specification)
The **Data Science Image** provides a ready-to-use environment for machine learning, artificial intelligence, and data analytics workloads. It comes fully configured with GPU acceleration and essential data science tools, allowing you to begin experimentation and model development immediately without additional setup.
***Specifications:***
* **OS:** Ubuntu 24.04.2 LTS
* **Includes:**
* Python 3.12
* Conda 25.7.0
* CUDA 12.1
* RAPIDS 25.6.0
* **Ideal for:**
* Building and training deep learning or machine learning models using GPU acceleration.
* Analyzing and processing large datasets with GPU-accelerated data frames.
* Running distributed computing tasks with frameworks such as **Ray**.
* Developing, visualizing, and testing AI workflows directly from **Jupyter Notebooks**.
[View full image specification →](/guides/clouds/data-science-image-full-specification)
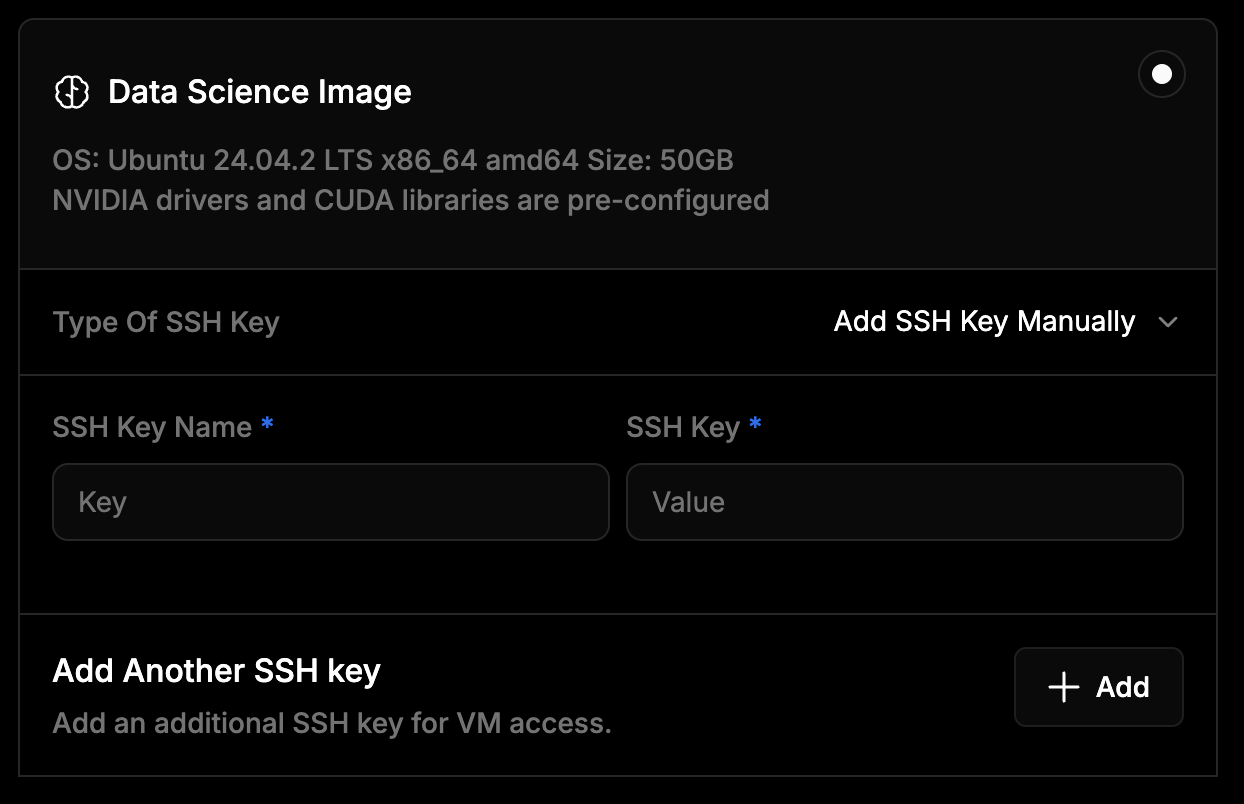 #### 4. Add your SSH Key
Choose one of the following methods to access your VM securely:
Partner-supplied clusters only support **Manual SSH key input**. You must add your SSH key by entering a key name and pasting your public key directly.
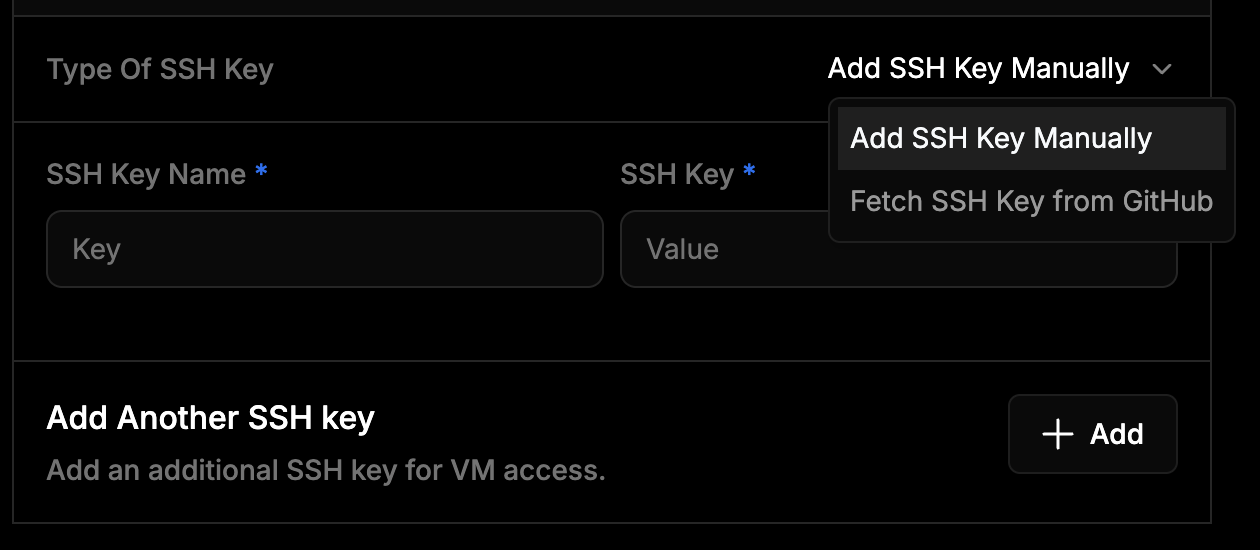
To use the **Fetch from GitHub** feature, select an **io.net-supplied processor**. This allows you to retrieve your public SSH key automatically by entering your *GitHub ID*, simplifying setup and secure access.
#### 4. Add your SSH Key
Choose one of the following methods to access your VM securely:
Partner-supplied clusters only support **Manual SSH key input**. You must add your SSH key by entering a key name and pasting your public key directly.
To use the **Fetch from GitHub** feature, select an **io.net-supplied processor**. This allows you to retrieve your public SSH key automatically by entering your *GitHub ID*, simplifying setup and secure access.
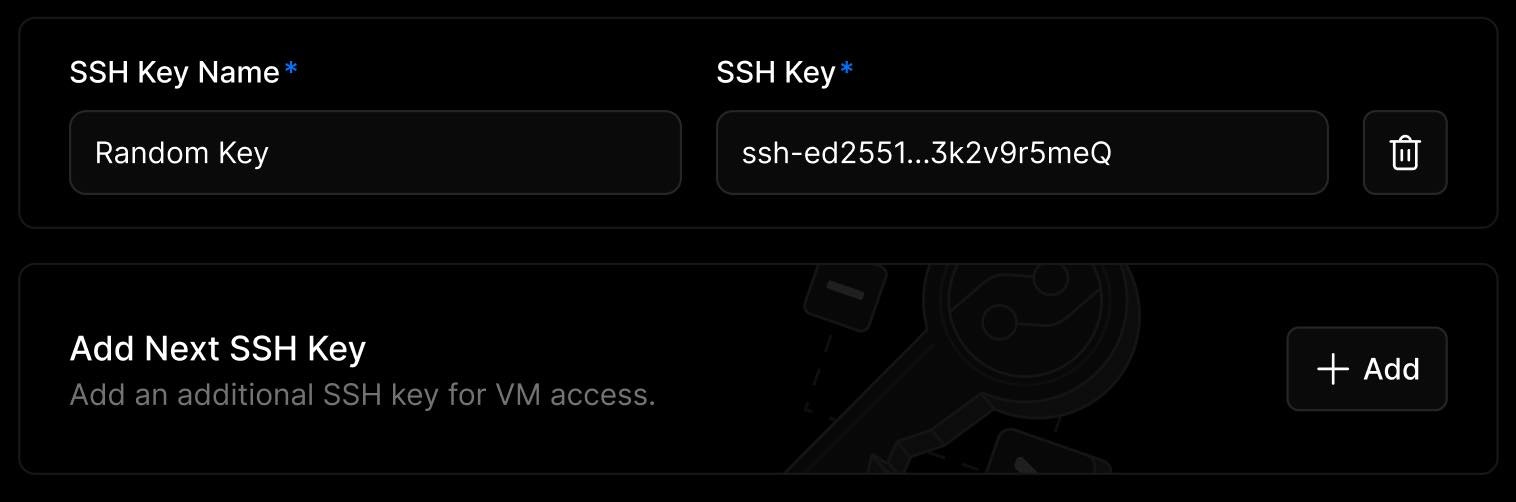
 Use this option to add your SSH key directly.
1. Enter a **Key Name** to identify the key.
2. Paste your **public SSH key** into the field provided.
You can repeat these steps to add multiple SSH keys if several users or systems require access. Each key you add will be authorized for SSH connections to your deployed VM.
This method is especially useful if you manage SSH keys locally or use multiple machines. It also ensures that you can explicitly control which public keys are linked to your cluster.
Make sure that you paste only the public portion of your SSH key. Private keys should never be uploaded or shared.
Use this option to add your SSH key directly.
1. Enter a **Key Name** to identify the key.
2. Paste your **public SSH key** into the field provided.
You can repeat these steps to add multiple SSH keys if several users or systems require access. Each key you add will be authorized for SSH connections to your deployed VM.
This method is especially useful if you manage SSH keys locally or use multiple machines. It also ensures that you can explicitly control which public keys are linked to your cluster.
Make sure that you paste only the public portion of your SSH key. Private keys should never be uploaded or shared.
 If your public SSH keys are already associated with your GitHub account, you can retrieve them automatically using the Fetch from GitHub feature.
1. Select the **Fetch SSH key from GitHub** option in the Type of *SSH key* field.
2. Enter your **GitHub ID**, or multiple **GitHub IDs** separated with commas, in the field provided.
3. The system will automatically retrieve and apply your public SSH keys from your GitHub profile.
This option is a fast and convenient way to authenticate without copying or pasting keys manually. It is especially useful if you frequently rotate keys or work across multiple environments, since your GitHub account always stores the latest authorized keys.
You can view or manage your SSH keys in your GitHub account by navigating to **Settings > SSH and GPG keys**.
### 5. Customize your Virtual Machine (Optional)
In this step, you can personalize your deployment by assigning a **name** and configuring **network services**.
If your public SSH keys are already associated with your GitHub account, you can retrieve them automatically using the Fetch from GitHub feature.
1. Select the **Fetch SSH key from GitHub** option in the Type of *SSH key* field.
2. Enter your **GitHub ID**, or multiple **GitHub IDs** separated with commas, in the field provided.
3. The system will automatically retrieve and apply your public SSH keys from your GitHub profile.
This option is a fast and convenient way to authenticate without copying or pasting keys manually. It is especially useful if you frequently rotate keys or work across multiple environments, since your GitHub account always stores the latest authorized keys.
You can view or manage your SSH keys in your GitHub account by navigating to **Settings > SSH and GPG keys**.
### 5. Customize your Virtual Machine (Optional)
In this step, you can personalize your deployment by assigning a **name** and configuring **network services**.
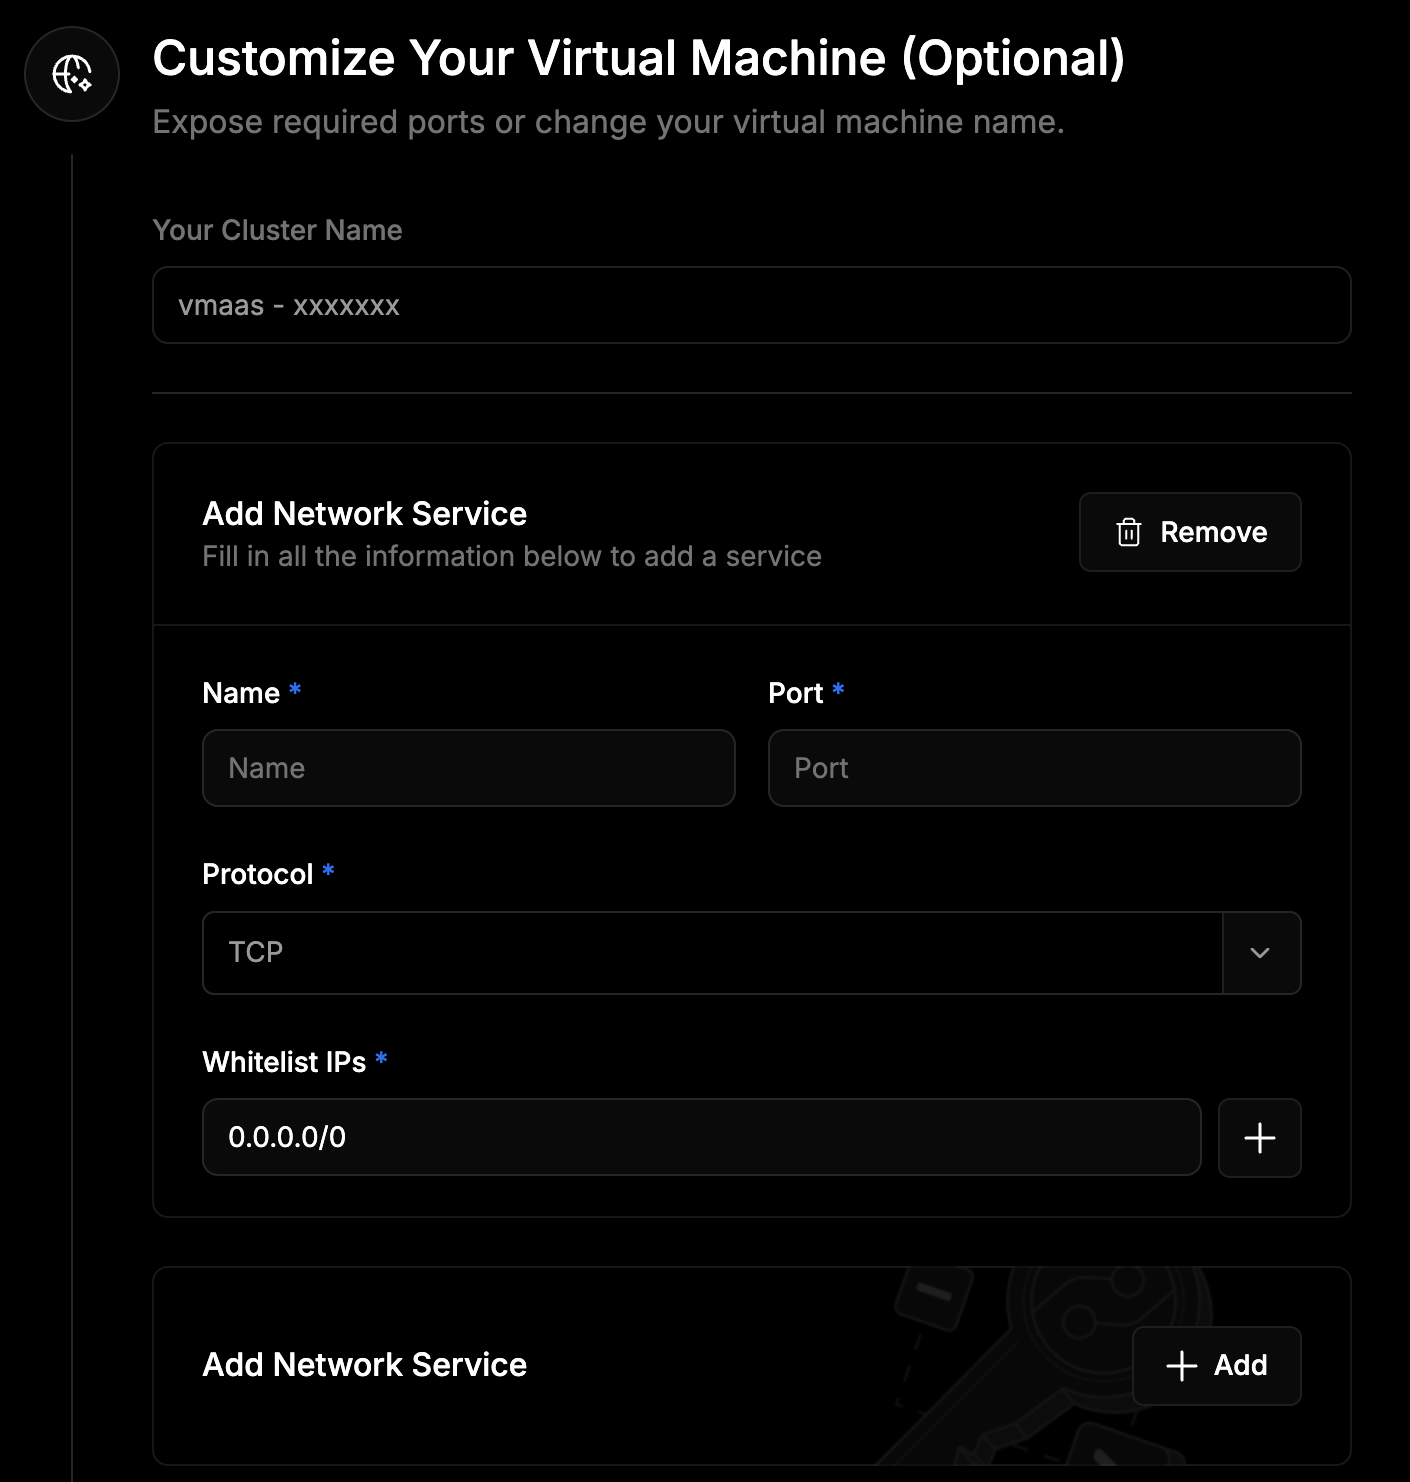 **Cluster Name**
You can assign a unique name to your cluster to help identify and manage it easily.
Enter your preferred name in the **Your Cluster Name** field. This name will appear throughout your dashboard and logs, making it simpler to distinguish between different clusters or projects.
**Network Services**
Network services allow you to expose specific ports on your virtual machine that are necessary for your applications or workflows. These ports enable external access to services running inside your virtual machine, such as APIs, web applications, or databases.
By defining network services during setup, you ensure that your required tools and applications are reachable while keeping all other ports securely closed by default. This approach provides flexibility for your workloads without compromising security.
You can configure multiple network services depending on your use case.
Partner-supplied clusters expose all ports. However, the following ports are occupied by default:
* ***Port 22 - SSH Access***
* ***Port 53 - System DNS***
* ***Port 5555 - NVIDIA Host Engine***
* ***Port 9100 - Node Exporter: Metrics***
* ***Port 9400 - DCGM Exporter: GPU Metrics***
* ***Port 12345 and 12346 - Grafana Agent***
To expose additional ports or services, follow these steps:
1. Click **Add Network Service**
2. Provide the required details:
* *Service Name*
* *Port Number*
* *Protocol* (TCP or UDP)
* *Whitelisted IPs* (IPv4 subnet)
3. Click the **+** button to add each IP to your whitelist.
Network services and port configurations cannot be changed after virtual machine deployment. Ensure that all required ports are defined before deployment, and expose them in your Docker command inside the VM.
When deploying containers, you must expose ports in two locations:
1. **Inside the VM (Docker):**
Specify ports when running your container.
```bash theme={null}
docker run -d -p 8082:8082 your-image-name
```
2. **io.net Network or Frontend Configuration:**
After deployment, the platform assigns external ports that map to your container ports.\
These external ports are used to access your services.
Docker port exposure inside the VM does not automatically propagate to the external network. Both configurations are required for external accessibility.
### 6. Review and Deploy
A sidebar on the right displays all your deployment details, including:
* *Machine Type*
* *Processor*
* *Cost*
* *GPUs per VM*
* *Location*
* *Duration type (Hourly, Daily, Weekly, Monthly)*
* *Duration*
After confirming that all details are correct and the minimum requirements are met, click **Pay & Deploy**.
**Cluster Name**
You can assign a unique name to your cluster to help identify and manage it easily.
Enter your preferred name in the **Your Cluster Name** field. This name will appear throughout your dashboard and logs, making it simpler to distinguish between different clusters or projects.
**Network Services**
Network services allow you to expose specific ports on your virtual machine that are necessary for your applications or workflows. These ports enable external access to services running inside your virtual machine, such as APIs, web applications, or databases.
By defining network services during setup, you ensure that your required tools and applications are reachable while keeping all other ports securely closed by default. This approach provides flexibility for your workloads without compromising security.
You can configure multiple network services depending on your use case.
Partner-supplied clusters expose all ports. However, the following ports are occupied by default:
* ***Port 22 - SSH Access***
* ***Port 53 - System DNS***
* ***Port 5555 - NVIDIA Host Engine***
* ***Port 9100 - Node Exporter: Metrics***
* ***Port 9400 - DCGM Exporter: GPU Metrics***
* ***Port 12345 and 12346 - Grafana Agent***
To expose additional ports or services, follow these steps:
1. Click **Add Network Service**
2. Provide the required details:
* *Service Name*
* *Port Number*
* *Protocol* (TCP or UDP)
* *Whitelisted IPs* (IPv4 subnet)
3. Click the **+** button to add each IP to your whitelist.
Network services and port configurations cannot be changed after virtual machine deployment. Ensure that all required ports are defined before deployment, and expose them in your Docker command inside the VM.
When deploying containers, you must expose ports in two locations:
1. **Inside the VM (Docker):**
Specify ports when running your container.
```bash theme={null}
docker run -d -p 8082:8082 your-image-name
```
2. **io.net Network or Frontend Configuration:**
After deployment, the platform assigns external ports that map to your container ports.\
These external ports are used to access your services.
Docker port exposure inside the VM does not automatically propagate to the external network. Both configurations are required for external accessibility.
### 6. Review and Deploy
A sidebar on the right displays all your deployment details, including:
* *Machine Type*
* *Processor*
* *Cost*
* *GPUs per VM*
* *Location*
* *Duration type (Hourly, Daily, Weekly, Monthly)*
* *Duration*
After confirming that all details are correct and the minimum requirements are met, click **Pay & Deploy**.
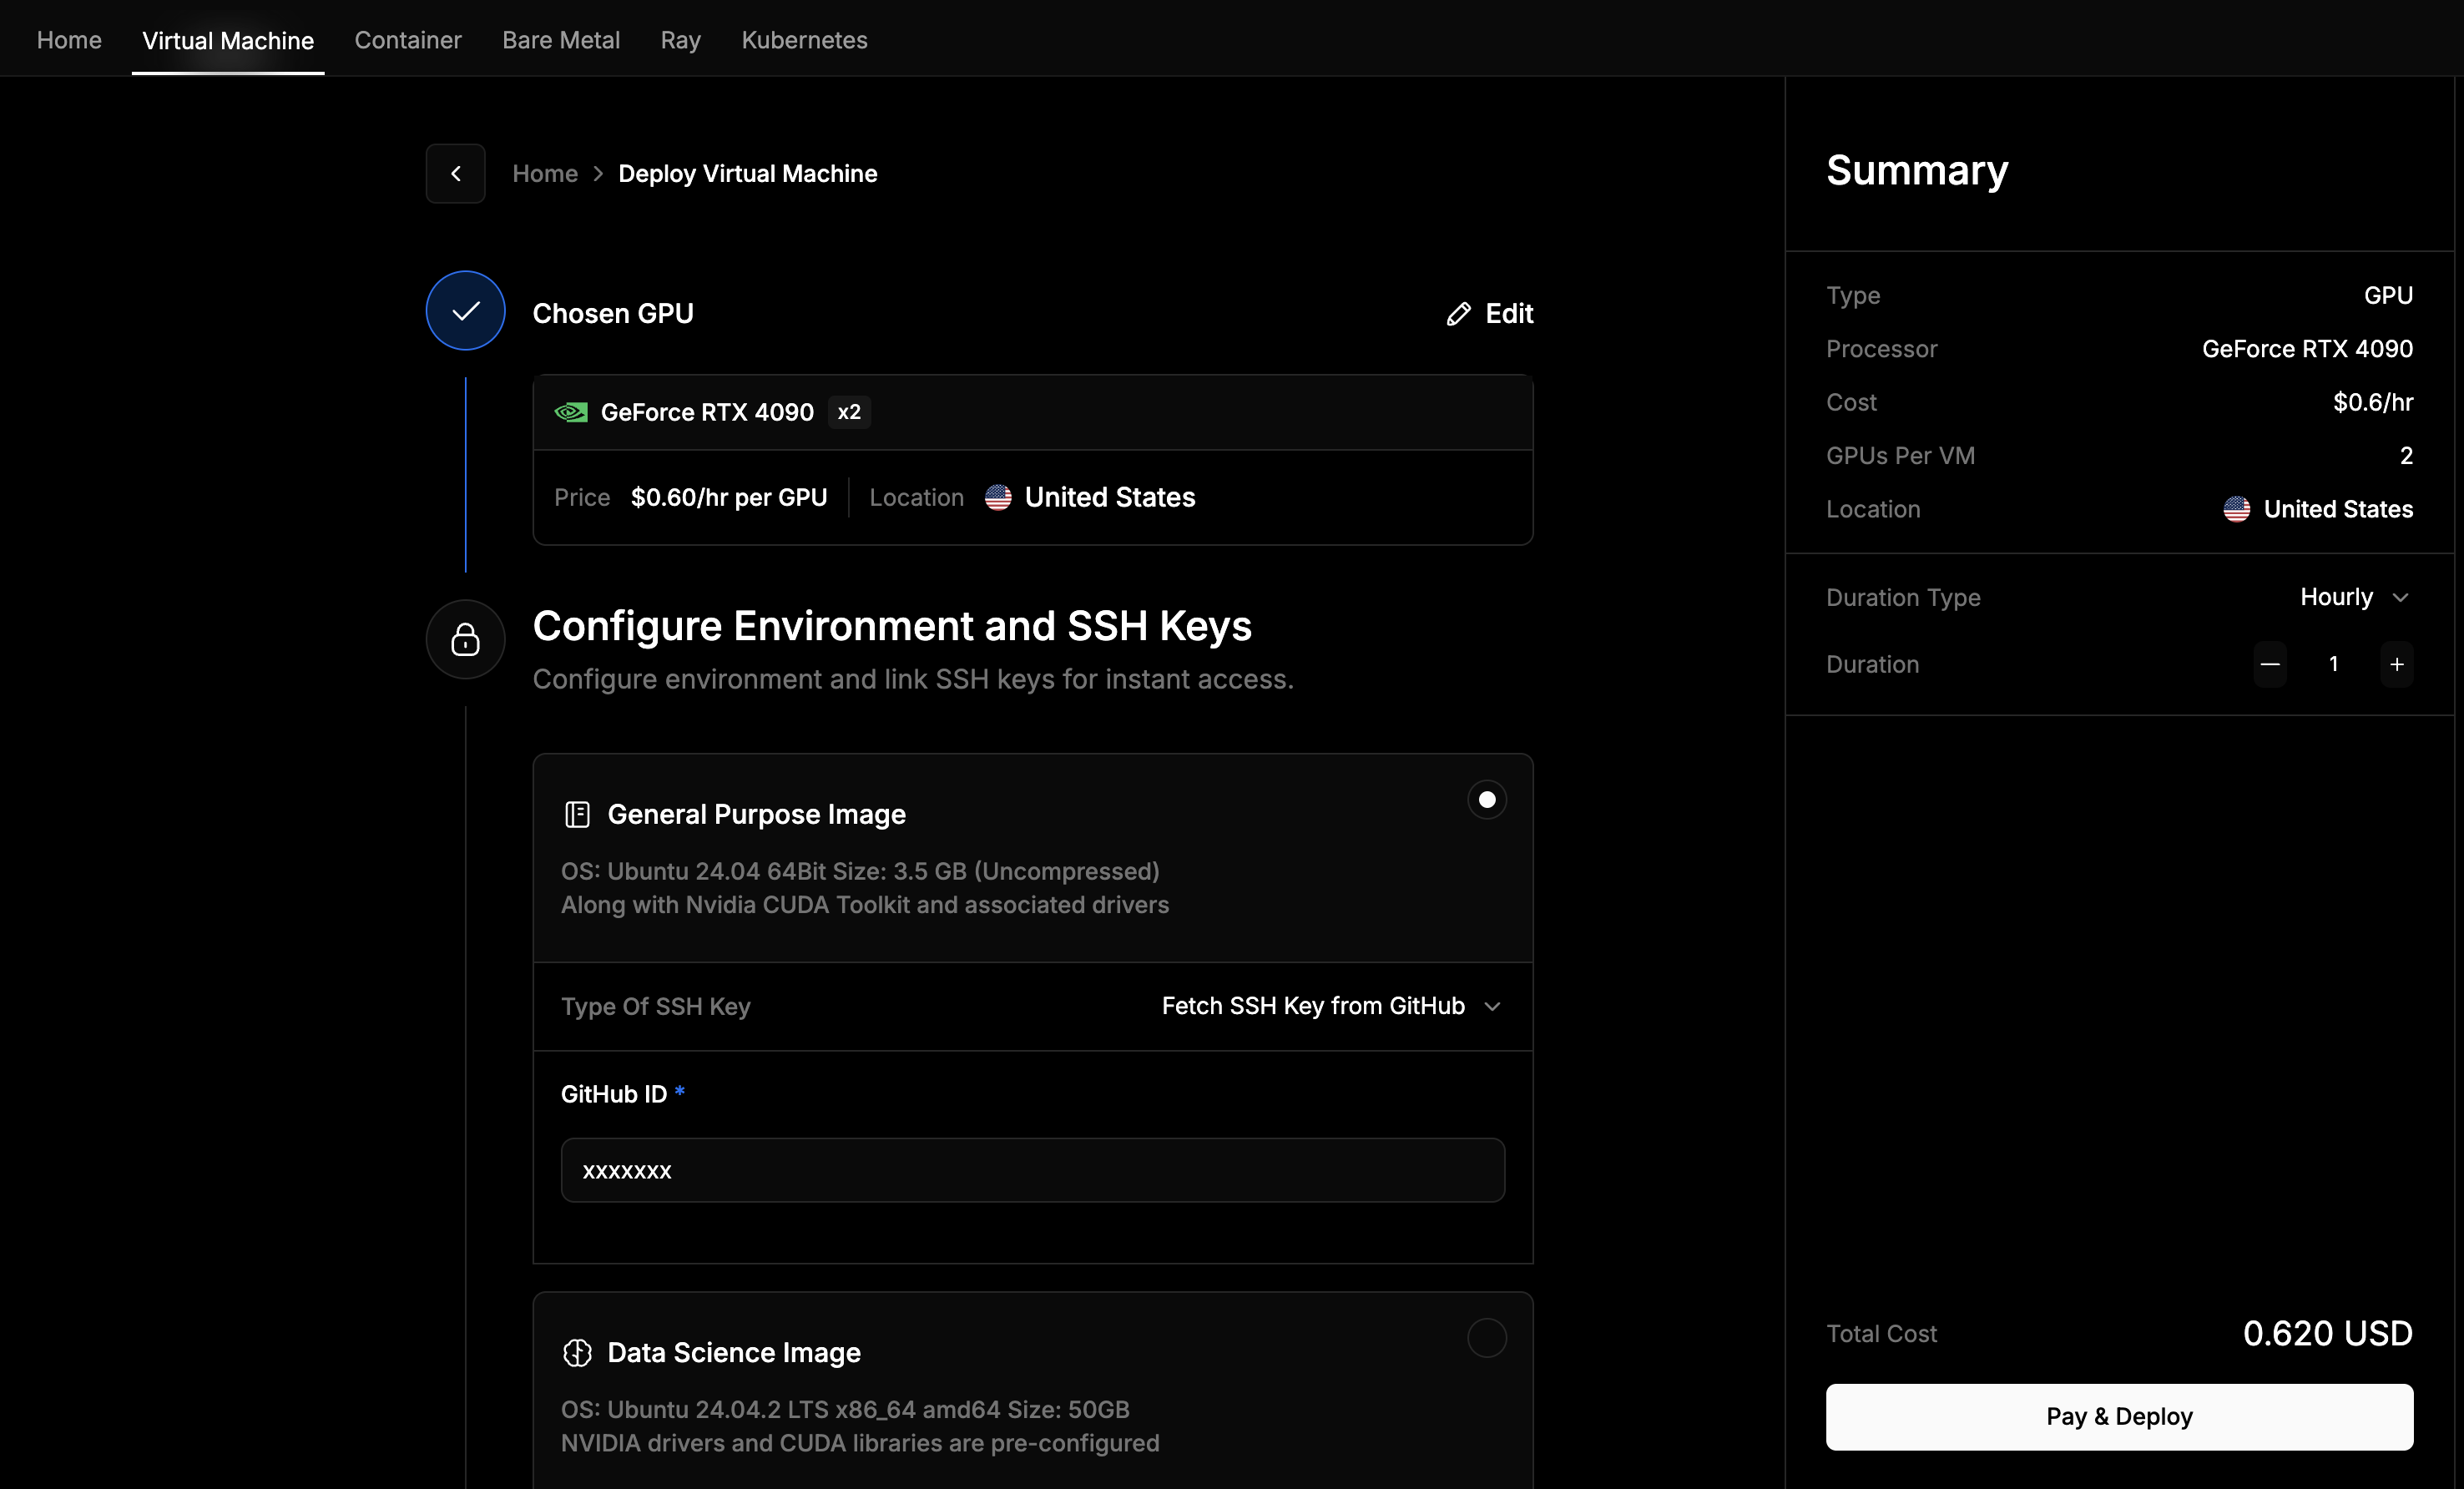 A payment window will appear where you can complete the transaction using **IO Credits**, **Credit or Debit Cards**, **USDC**, or **IO Coin**.
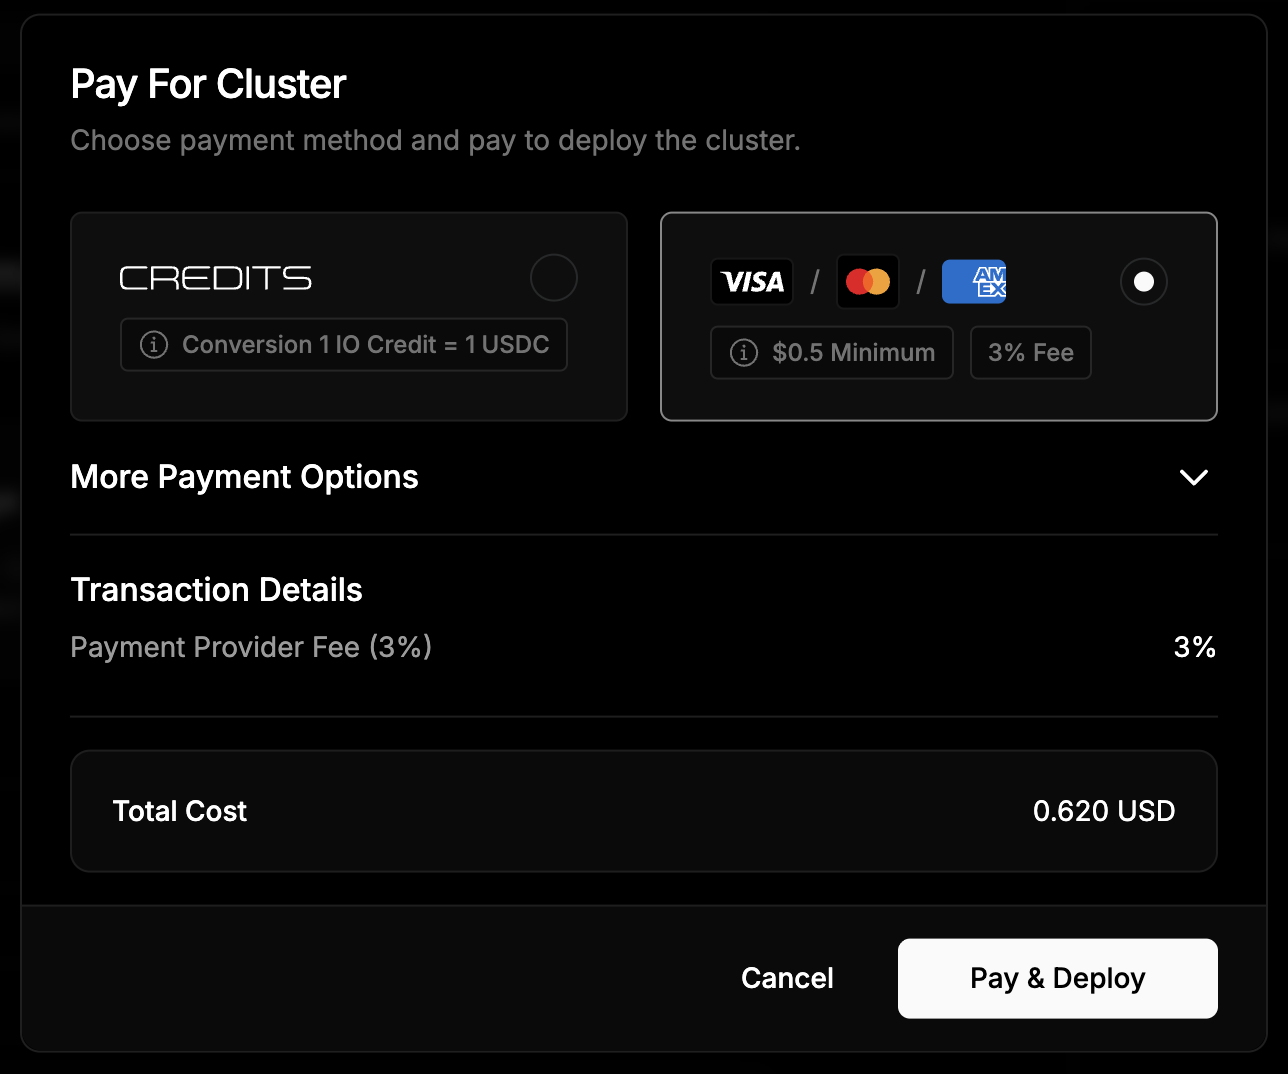 Once payment is confirmed, your cluster deployment will begin automatically.
## Viewing Virtual Machines
After deployment, you can view your virtual machines.
Navigate to the **Virtual Machines** tab to monitor performance or launch additional VMs.
The **Virtual Machines Dashboard** allows you to filter clusters by their current status. Click on a specific VM to open its details page.
Each **Detail** page shows you:
* Real-time resource usage information
* SSH connection details
* Billing and usage insights
### Connecting to your Virtual Machine
1. Locate the *SSH Access* field on your cluster page and copy the provided command.
Once payment is confirmed, your cluster deployment will begin automatically.
## Viewing Virtual Machines
After deployment, you can view your virtual machines.
Navigate to the **Virtual Machines** tab to monitor performance or launch additional VMs.
The **Virtual Machines Dashboard** allows you to filter clusters by their current status. Click on a specific VM to open its details page.
Each **Detail** page shows you:
* Real-time resource usage information
* SSH connection details
* Billing and usage insights
### Connecting to your Virtual Machine
1. Locate the *SSH Access* field on your cluster page and copy the provided command.
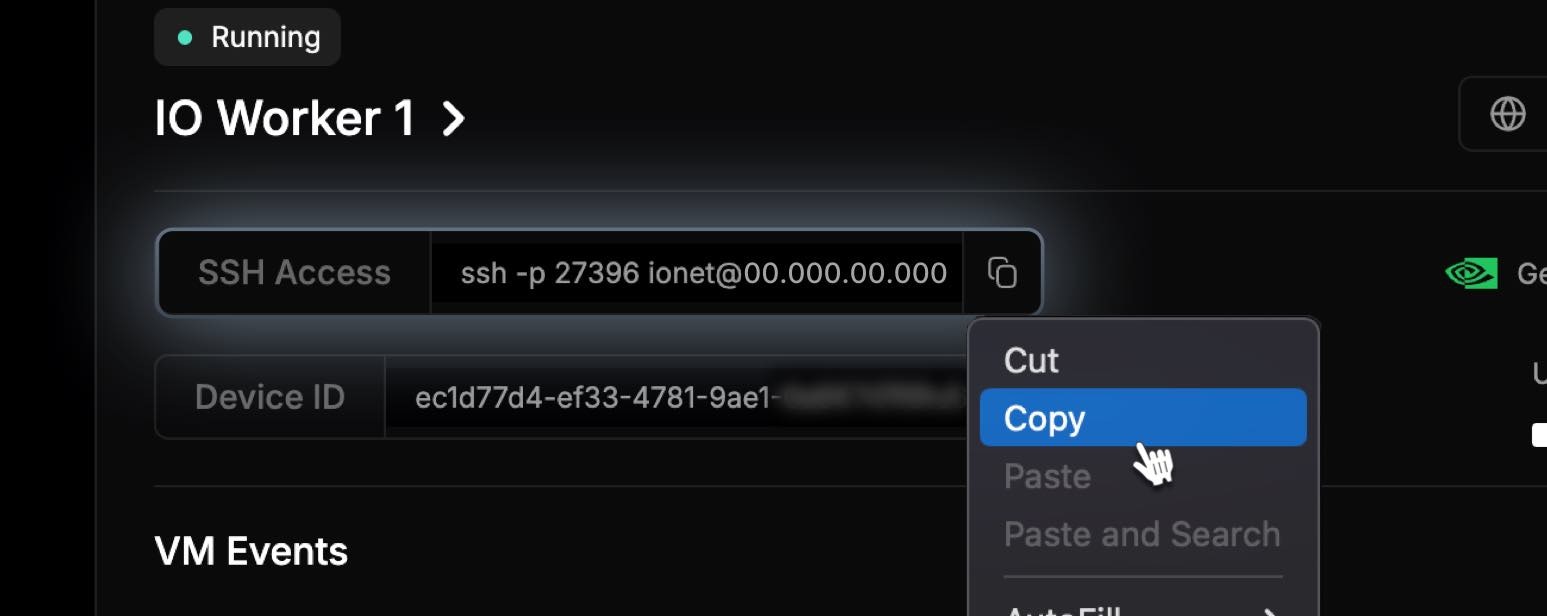 2. Open your **Terminal** and paste the command, then press **Enter**.
3. When prompted to confirm the connection, type **yes** and press **Enter**.
4. Once connected, you will see the welcome message and gain access to your VM through the SSH terminal.
2. Open your **Terminal** and paste the command, then press **Enter**.
3. When prompted to confirm the connection, type **yes** and press **Enter**.
4. Once connected, you will see the welcome message and gain access to your VM through the SSH terminal.