> ## Documentation Index
> Fetch the complete documentation index at: https://io.net/docs/llms.txt
> Use this file to discover all available pages before exploring further.
# Overview
> A step-by-step guide for setting up the environment for io.net on Windows-based machines.
### Go to
[cloud.io.net](https://cloud.io.net)
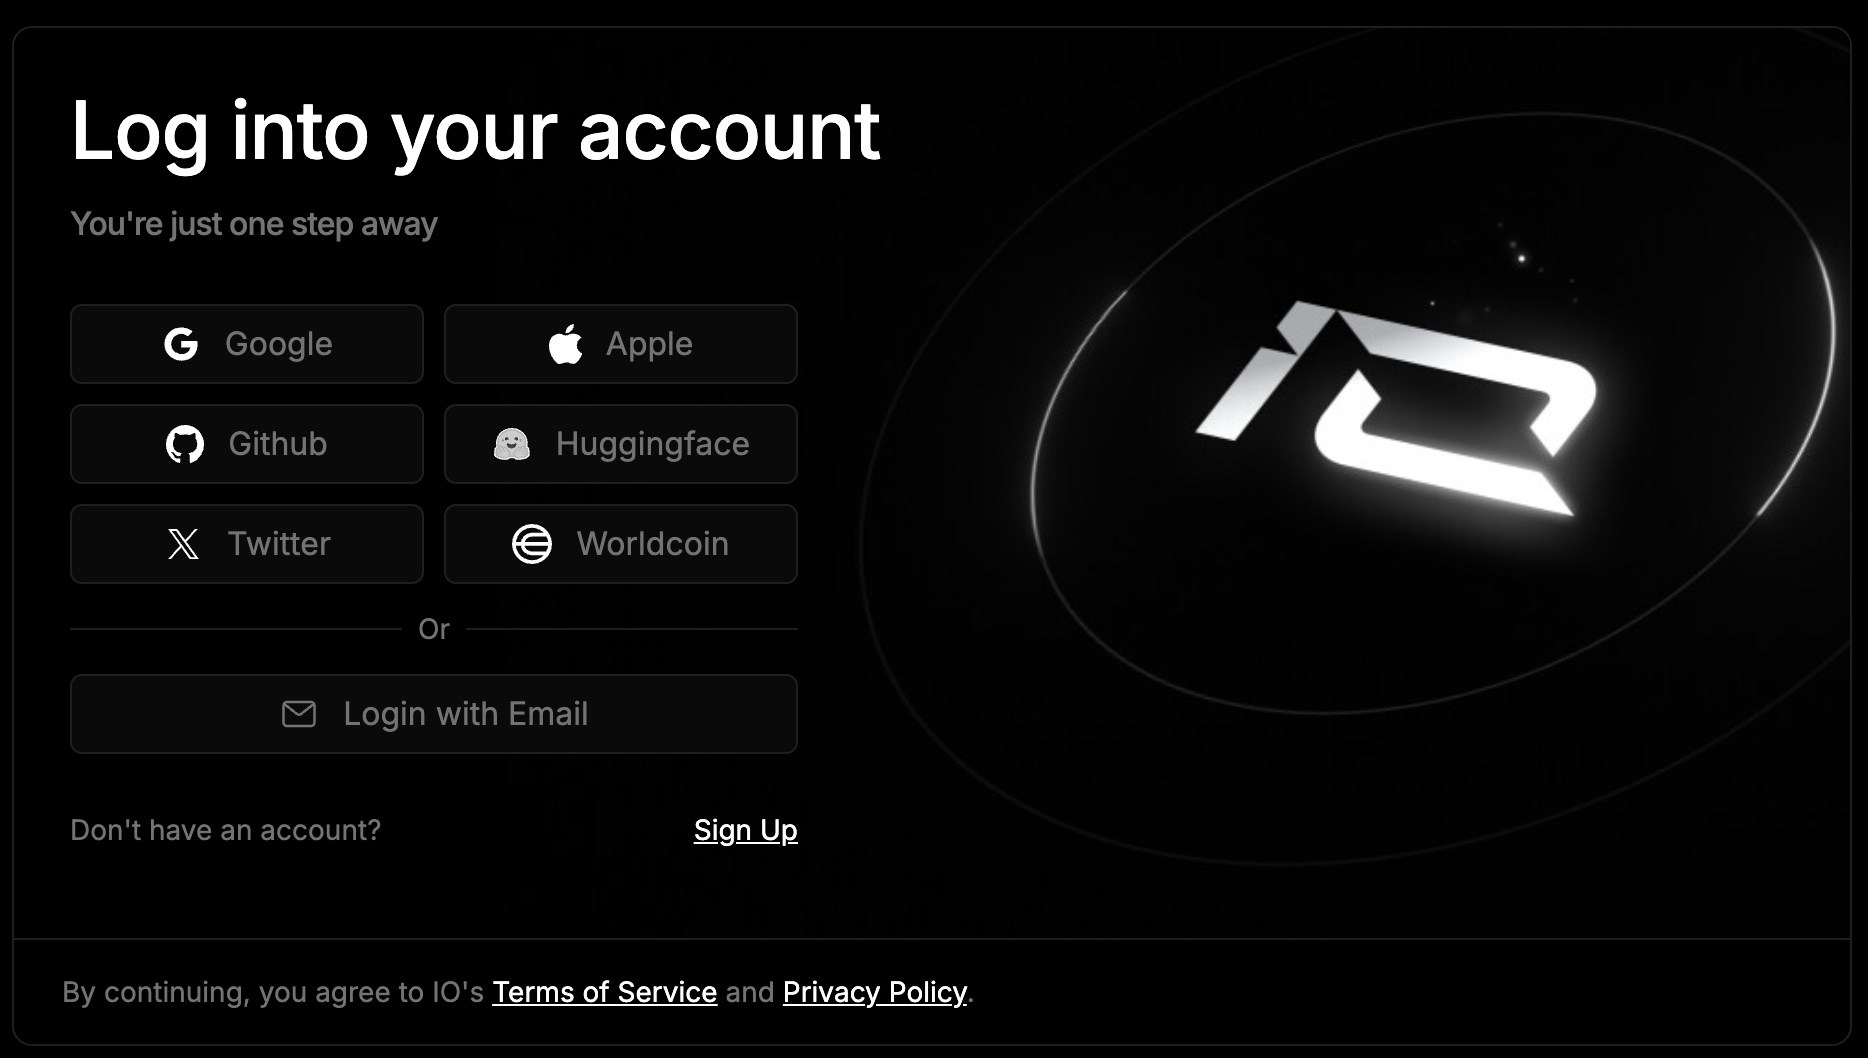
If you have not yet created an account, you can sign up on [io.net](http://io.net) using Google, Apple ID, GitHub, Hugging Face, X, Worldcoin, or simply with a one-time password by clicking the "Login with Email" button.
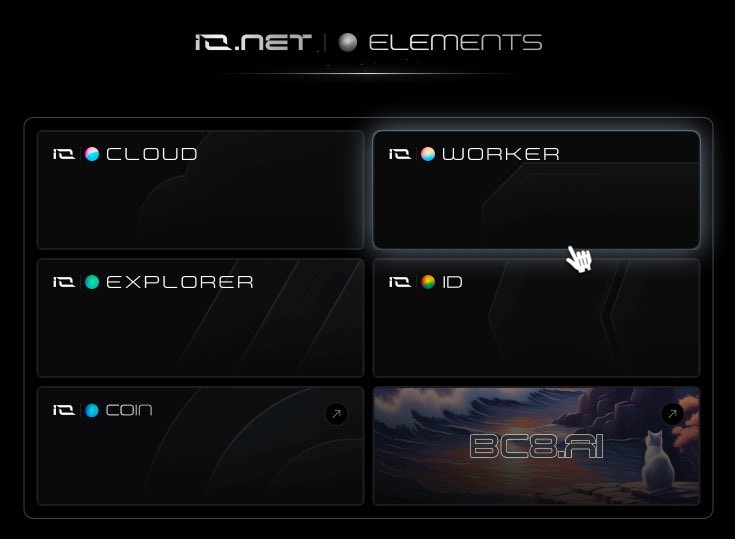
### 1. From IO Elements Go to IO Worker
IO Elements serves as your new control panel for navigating the service efficiently. Click on **IO Worker** to delve deeper into its functionalities and features.
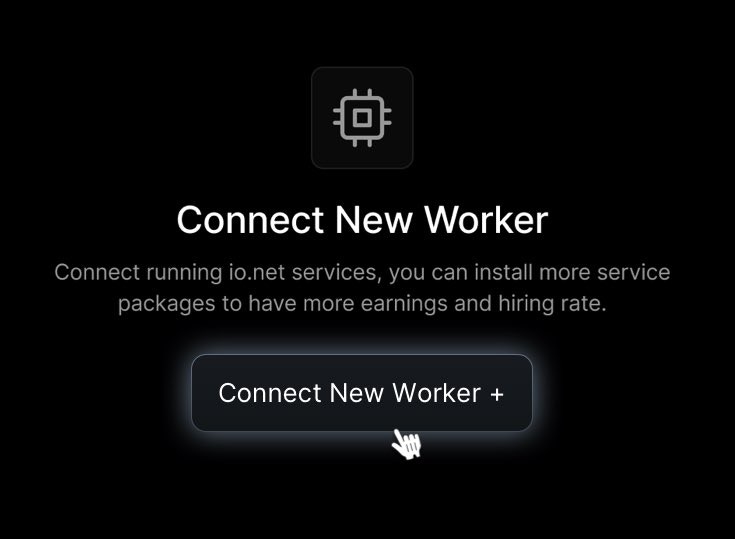
### 2. Click "Connect New Worker" to Open the Wizard
If Workers have not been added, click Connect New Worker. If the screen is full of information, find the same button in the upper right corner.
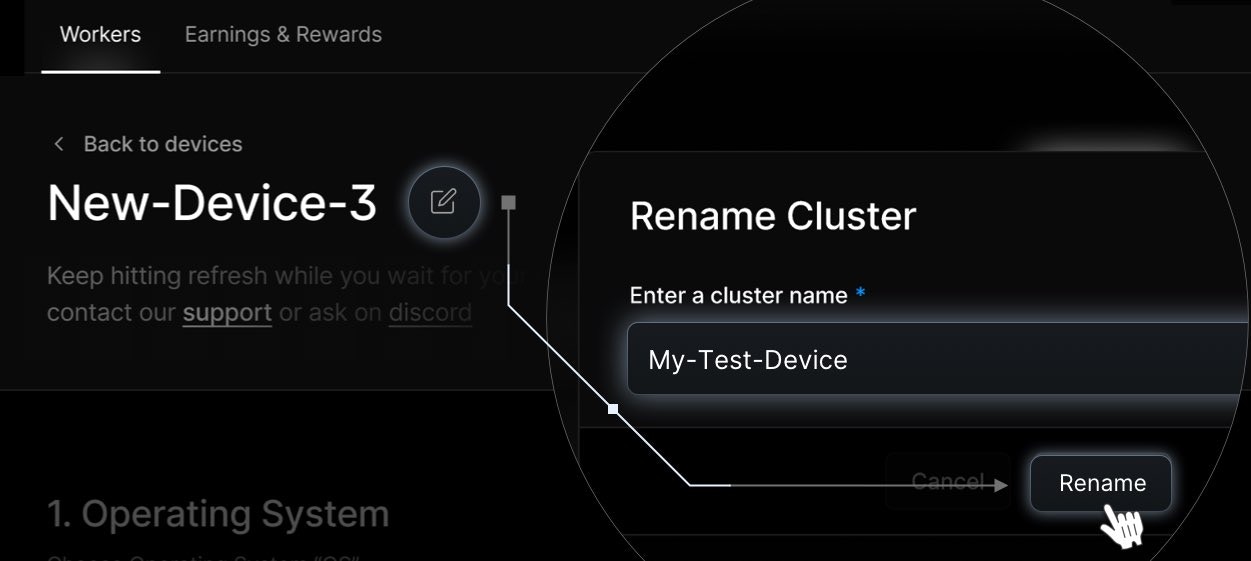
### 3. Name Your Device
Click the "**Pencil**" icon to open the popup for editing the device name.
Please add a unique name for your device. We suggest a format such as: **My-Test-Device** .
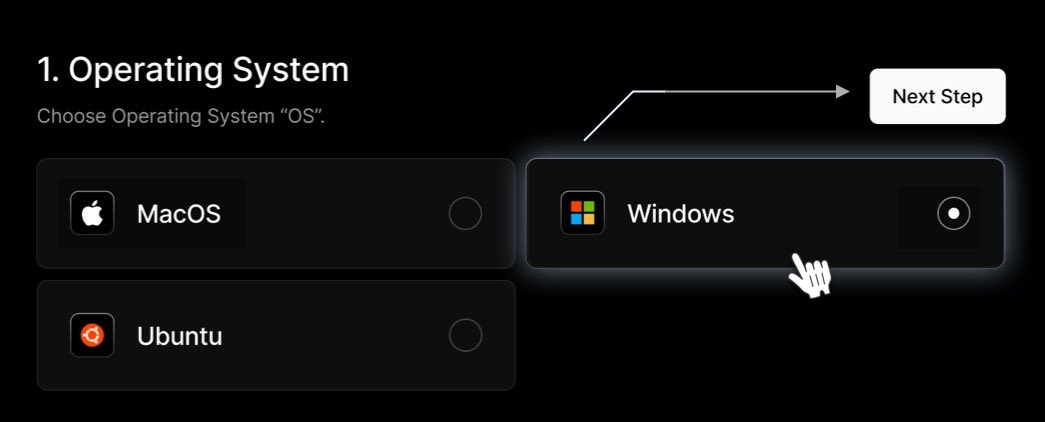
### 4. Select Windows Operating System
Choose the Operating System of your device from MacOS, **Windows** or Ubuntu.
### 5. Select Device Type
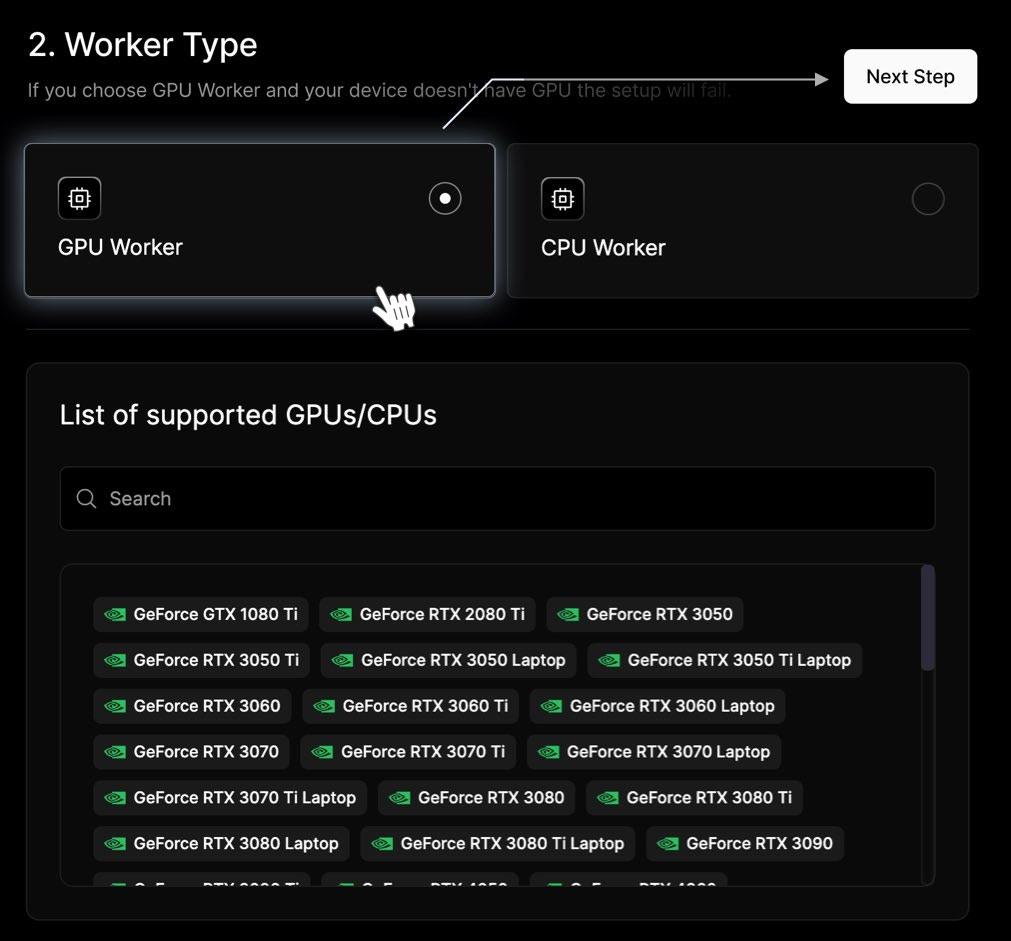
You should choose the device type based on your task. A video card is better suited for AI tasks, while a processor is more suitable for graphic rendering.
GPU - This is the part of your computer or laptop that handles graphics - the video card. It's usually from Nvidea or Radeon. You can find a full list of video cards that io.net is compatible with [here](/guides/workers/supported-devices).
CPU - This forms the core of every smart device in our world, including your computer or laptop. Now, alongside Intel and AMD processors, Apple's processors have also joined the lineup. You can find a comprehensive list of processors compatible with io.net [here](/guides/workers/supported-devices).
You can also verify whether your GPU or CPU is included in the list of devices supported by our service on the wizard page.
If you choose GPU .Worker and your device doesn't have GPU the setup will fail
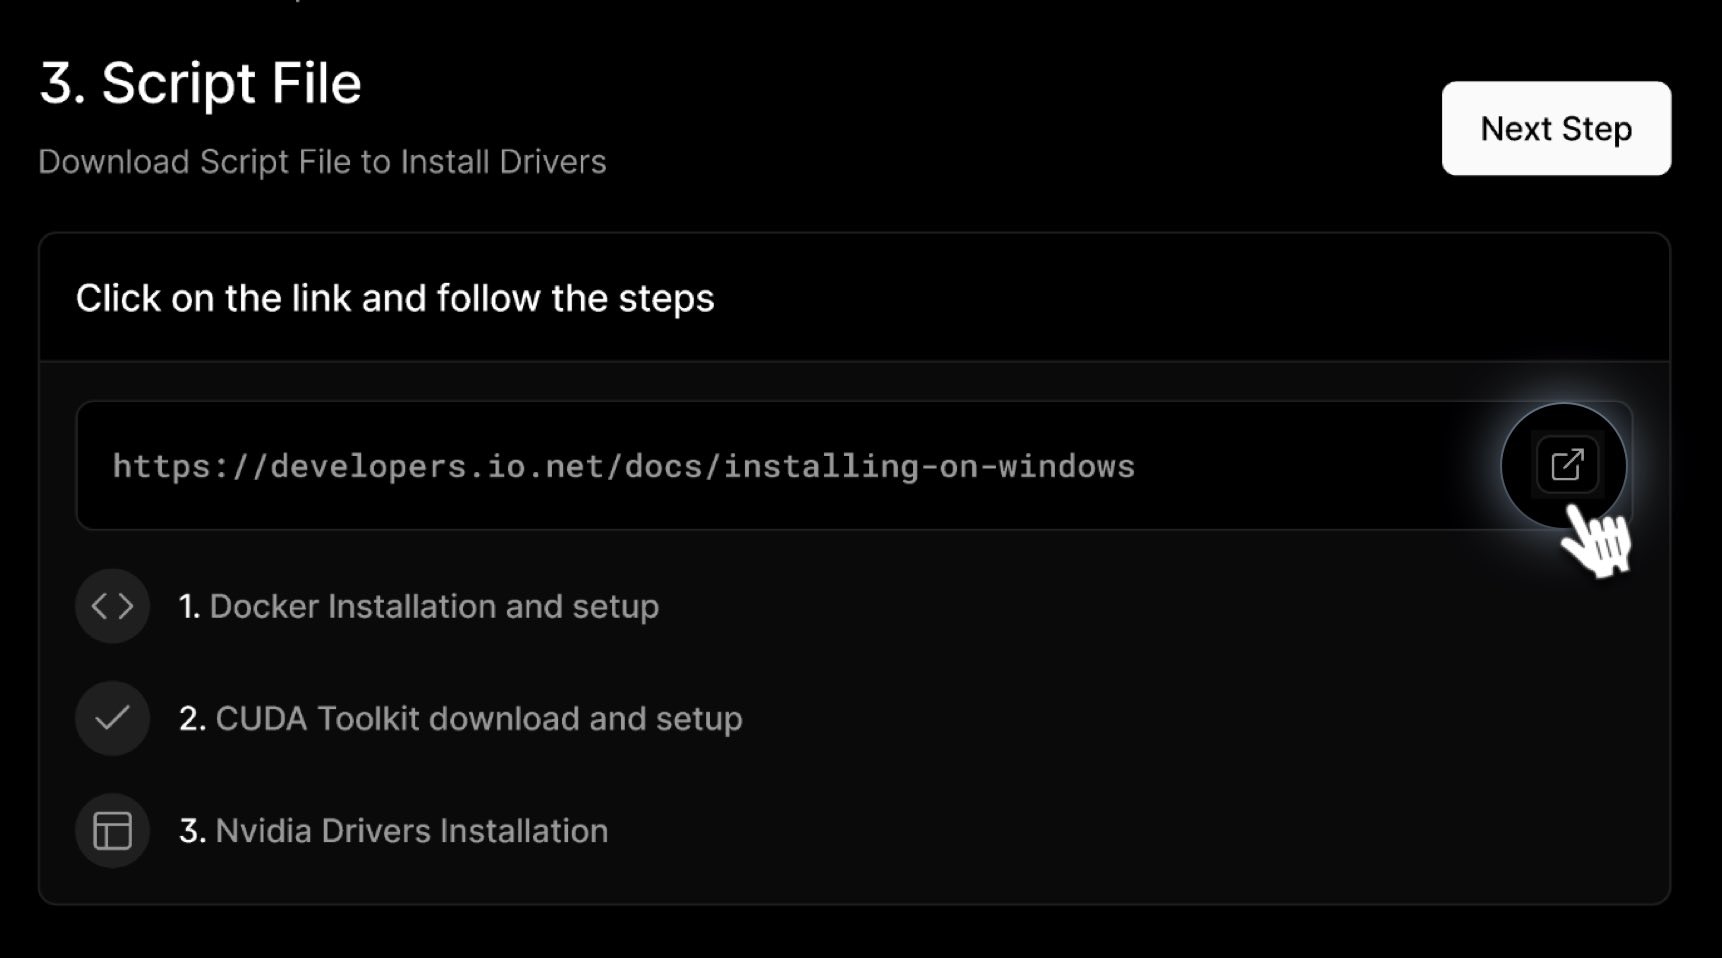
### 6. Prerequisites for Windows
Follow the steps below to complete the prerequisites:
1. Download and Install Desktop Docker. You can find comprehensive instructions on how to install Docker for Windows in this [concise guide](/guides/workers/install-docker-on-windows).
2. Then Download and Setup CUDA. Please refer to the instructions on how to do this by [following the link](/guides/workers/cuda-toolkit-optional).
3. Afterward (if needed or if not done yet), you'll need to install or update the correct NVIDIA driver for your video card. You can find instructions on how to do this [here](/guides/workers/install-nvidia-drivers-on-windows) .
When using SXM or NV Link, ensure that Fabric Manager is installed correctly and enabled. This will prevent initialization issues and ensure that all GPUs are functioning properly, thereby avoiding PoW verification failures.
### 7. Download and Launch IO Binary
**IO Binary** is a compiled executable file used to perform computational tasks and manage system operations. It is crucial for the operation of the platform as it handles essential functions directly related to the performance and reliability of computational resources.
Do not modify or run code directly in io.net’s docker containers. This may disqualify your device from earning block rewards or being hired. If you have suggestions or ideas for custom code in our Docker containers, contact customer support to suggest them.
In this step, what you are required to do is:
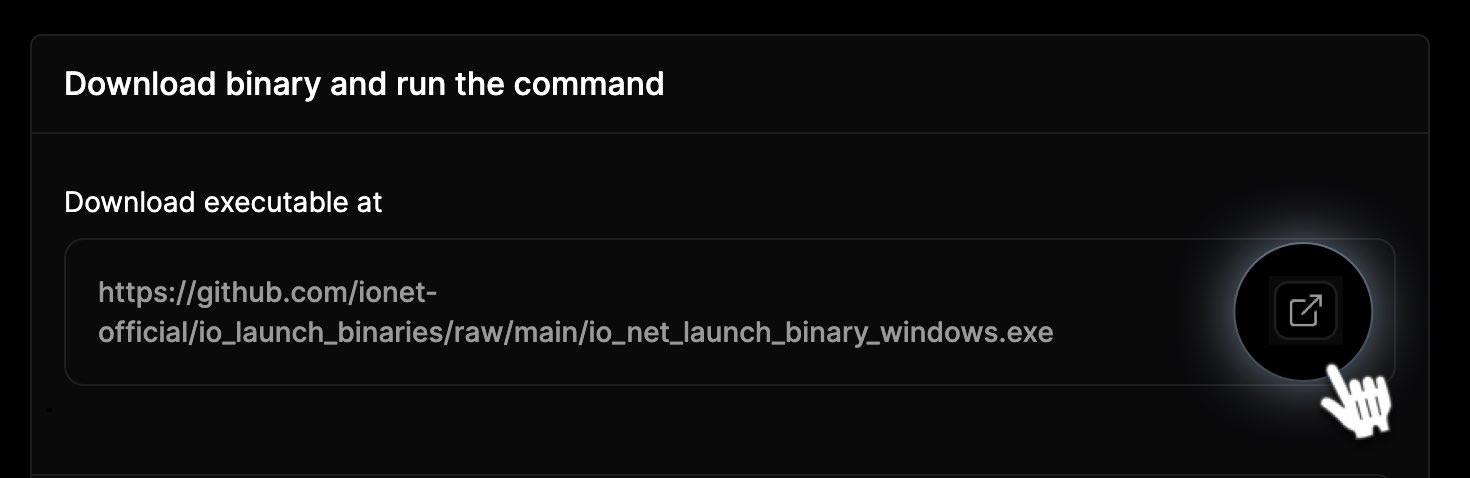
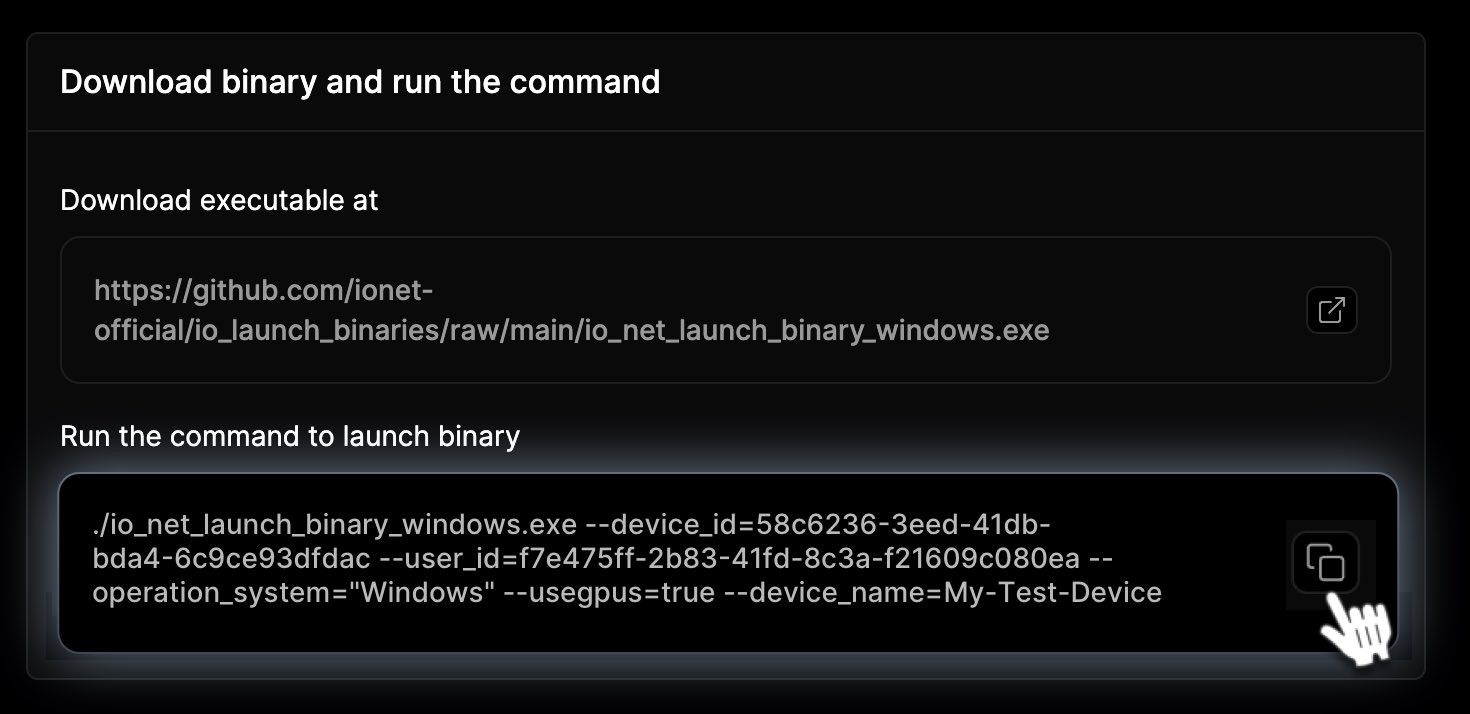
1. **Download the Executable File:** Copy the URL below, open your browser, and paste it. The browser downloads the executable file to your computer. **It's recommended to download the IO Binary again, as we often update versions for improvements.**
```
https://github.com/ionet-official/io_launch_binaries/raw/main/io_net_launch_binary_windows.exe
```
2. **Open IO Binary file into Terminal**
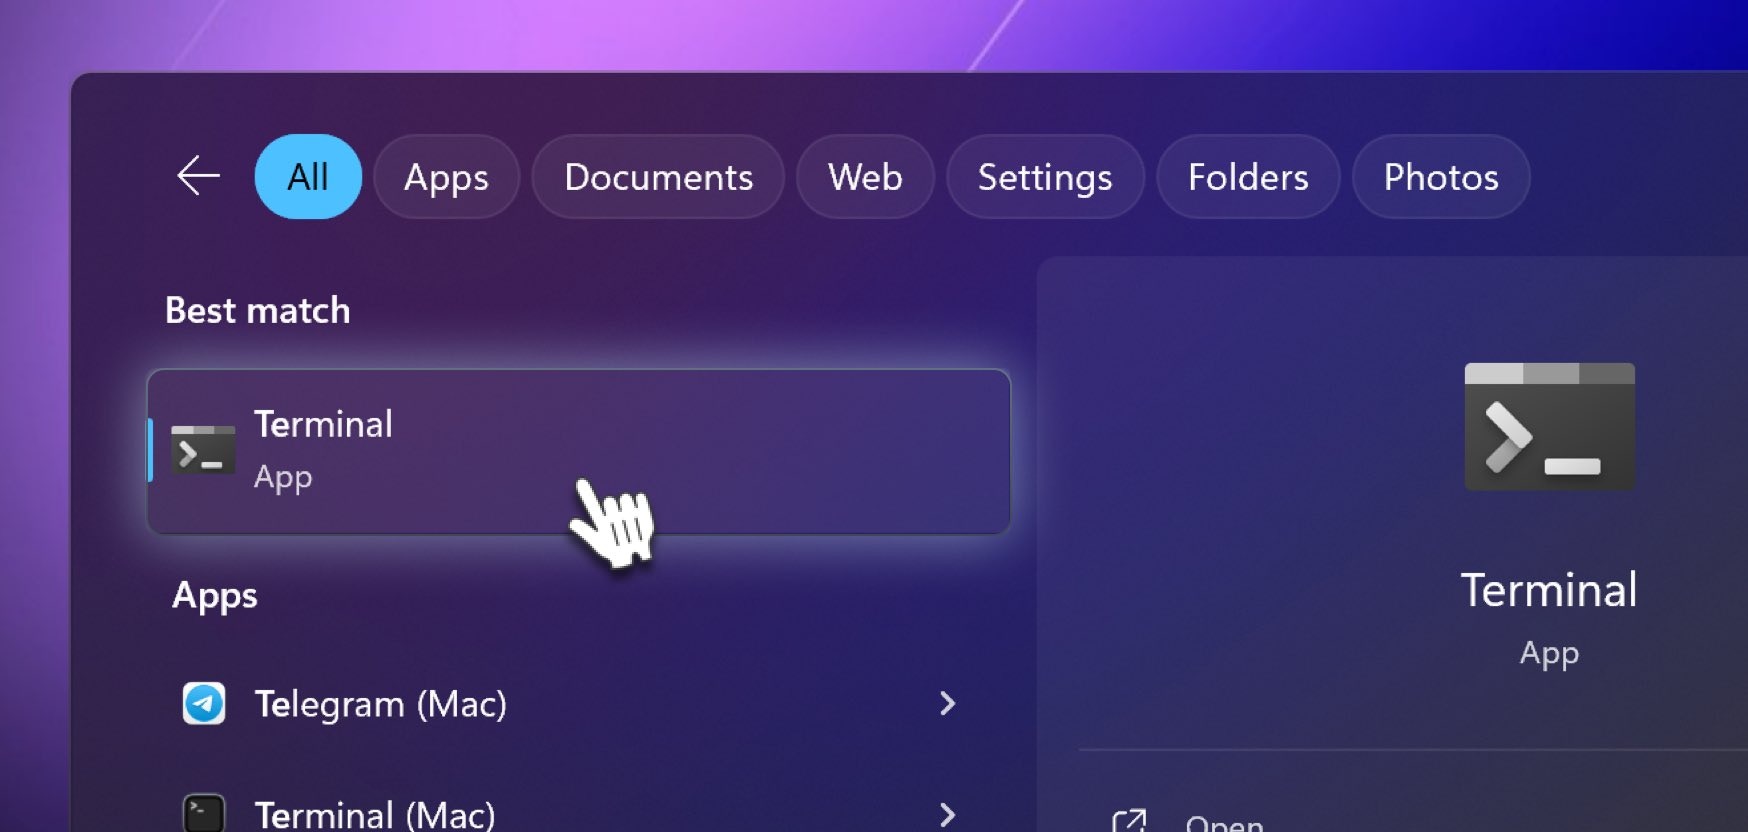
**Terminal** is a tool on your computer that allows you enter commands to tell the computer what to do. Instead of clicking on elements with a mouse, you write instructions, and the computer follows them. It's like talking directly to your computer using text.
* Click the **Start Menu** icon, then find and select the **Terminal** app from the popup menu.
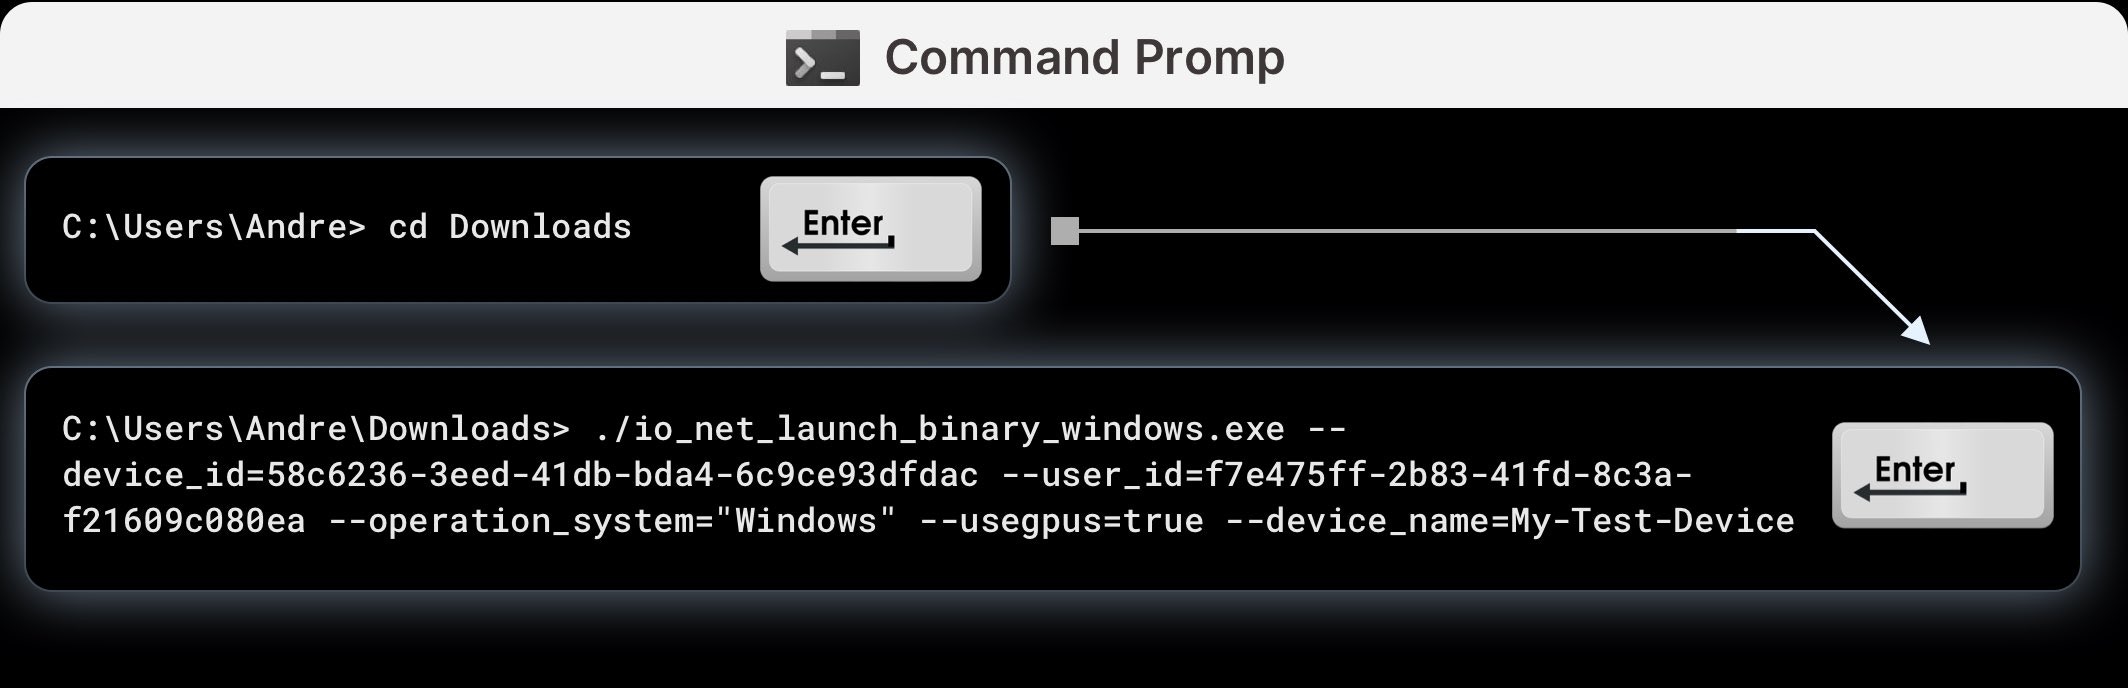
* In the **Terminal**, navigate to the **Downloads** folder by typing the command to go to the folder with the IO Binary.
```
cd Downloads
```
* Next, copy the command from your new worker page to launch the IO Binary.
Then paste it into the terminal and press Enter to run it.
### 8. Authorize Your New Device
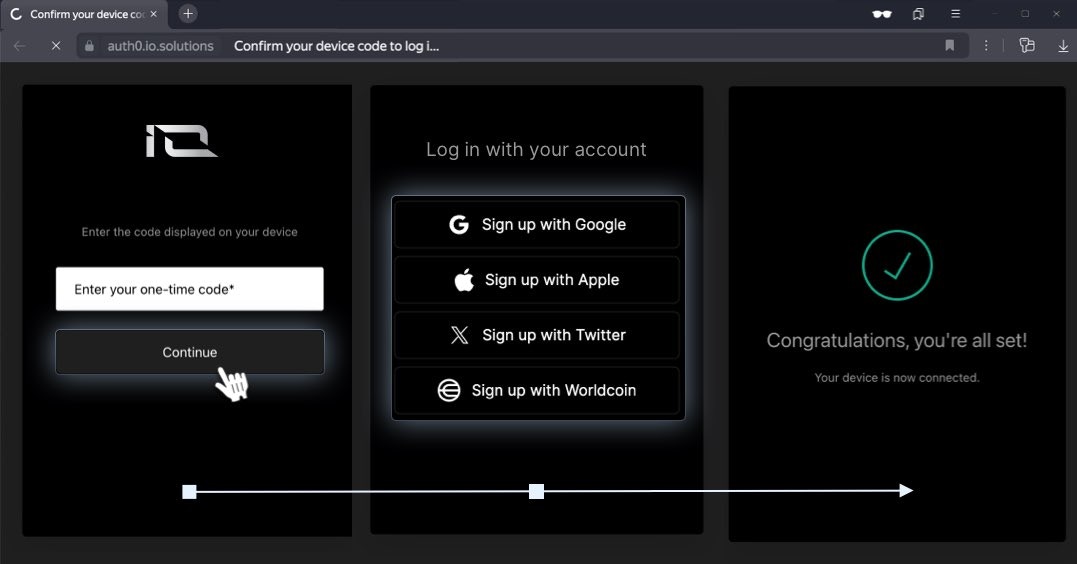
The IO Binary may prompt you to authorize your new device.
Remember, you have about 3 minutes to complete the authorization of the device. If you miss it, you will need to rerun the code again.
You can do this in two ways:
1. **Copy the Link from the Terminal**:
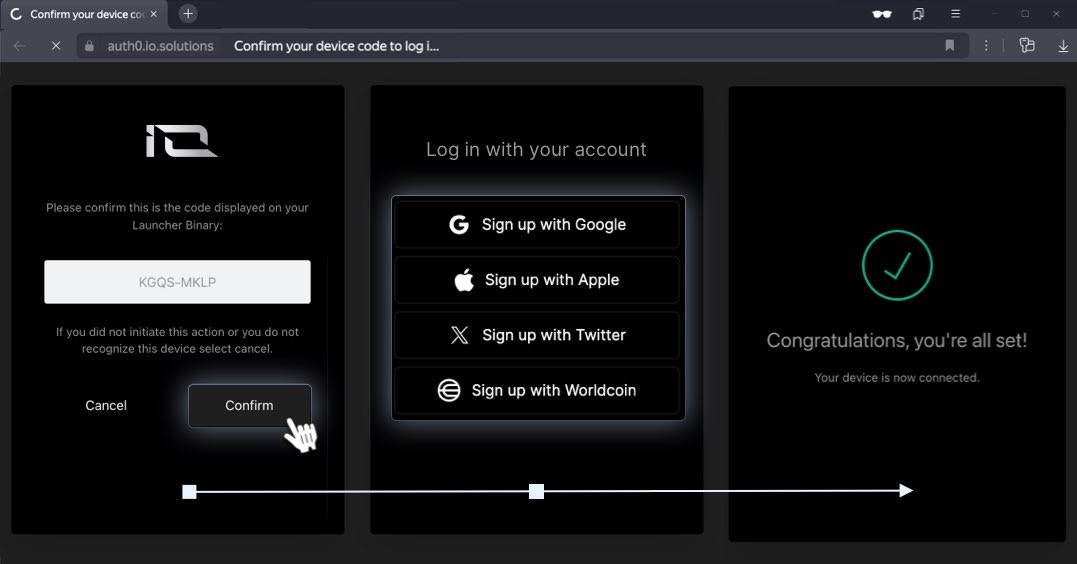
Paste it into your browser and confirm the action. After confirmation, the system will prompt you to log in.
2. **Copy the Code from the Terminal**:
Enter this code on the page [https://auth0.io.solutions/activate](https://auth0.io.solutions/activate) to authorize the device. After it, the system will prompt you to log in.
**Onboard Multiple Devices by Bypassing Interactive Authentication**
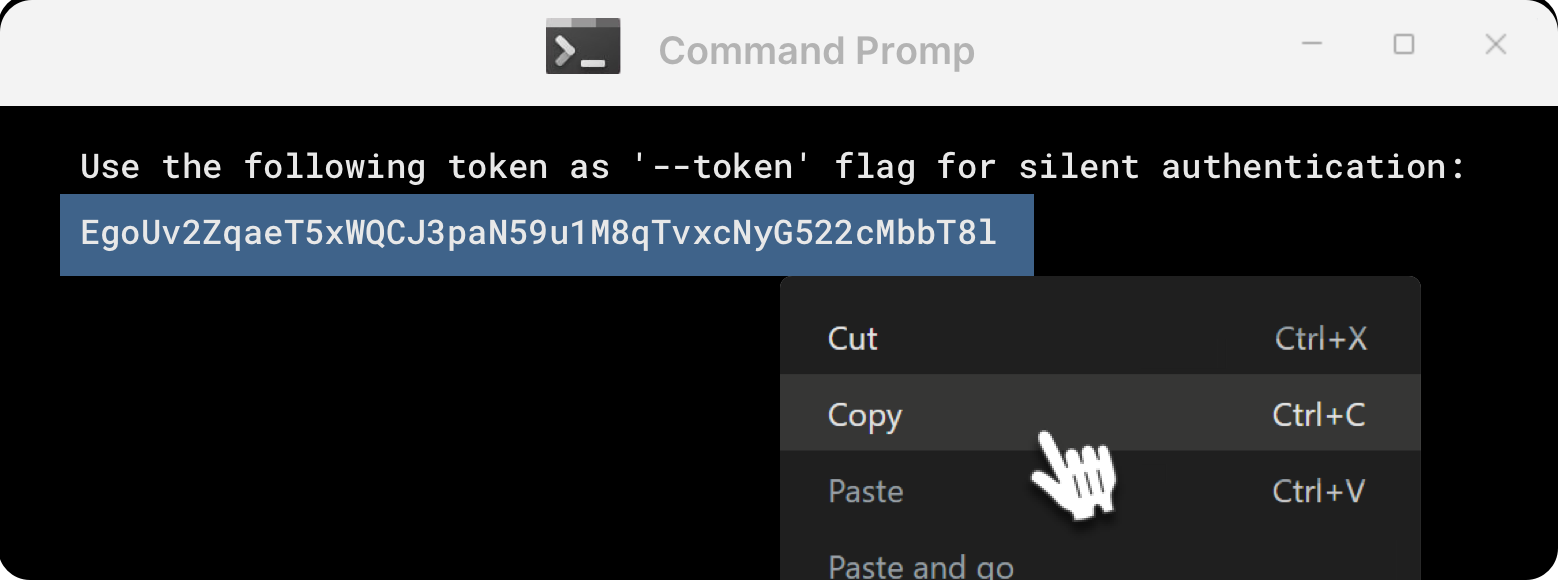
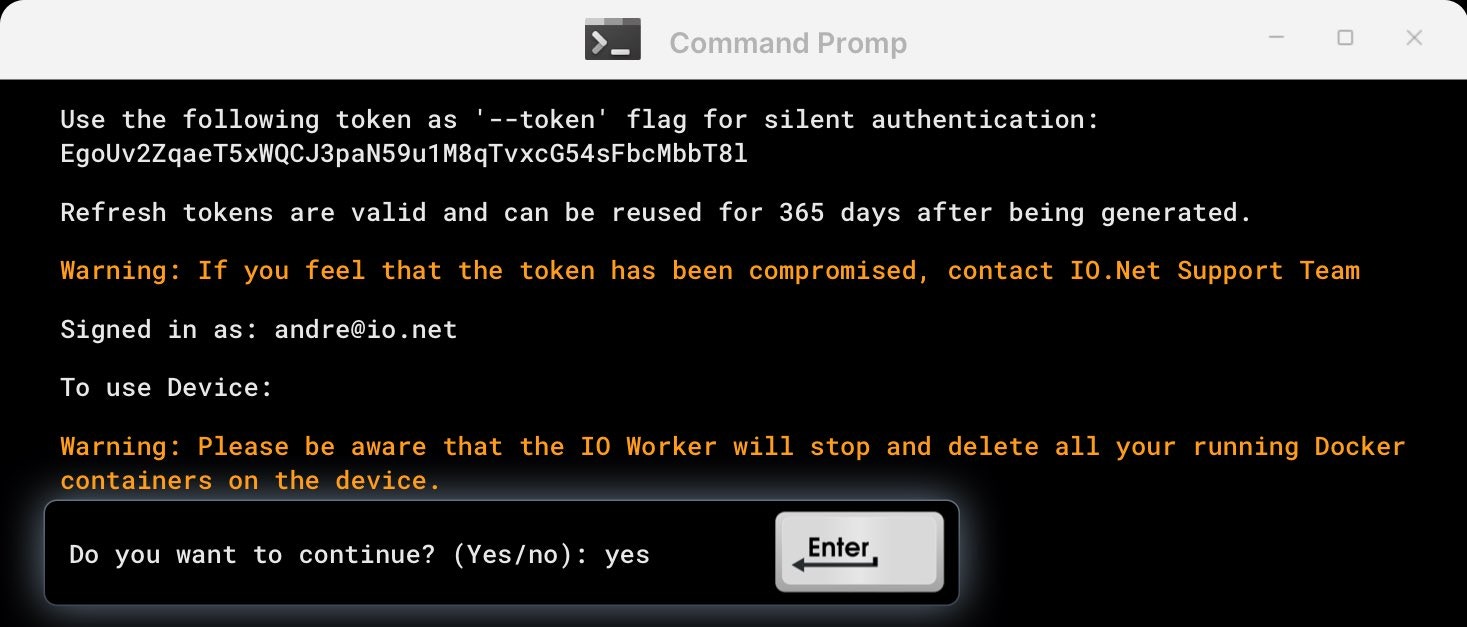
After you authenticate once, you can bypass the interactive auth process when you join additional devices. To do this, run the binary with an additional argument, the **--token** flag, followed by the token value.
In the Command Prompt, copy your token and pass the --token flag, followed by the token and run the binary.
```
io_net_launch_binary_windows.exe --token your-token-value
```
Tokens are valid for 12 months.
### 9. Remove Previously Installed Docker Containers
IO Binary will ask you questions related to previously installed Docker Containers. To continue the installation of IO Worker, you must agree to remove all old containers and proceed by typing: **Yes**
### 11. Wait for Worker Connection to Complete
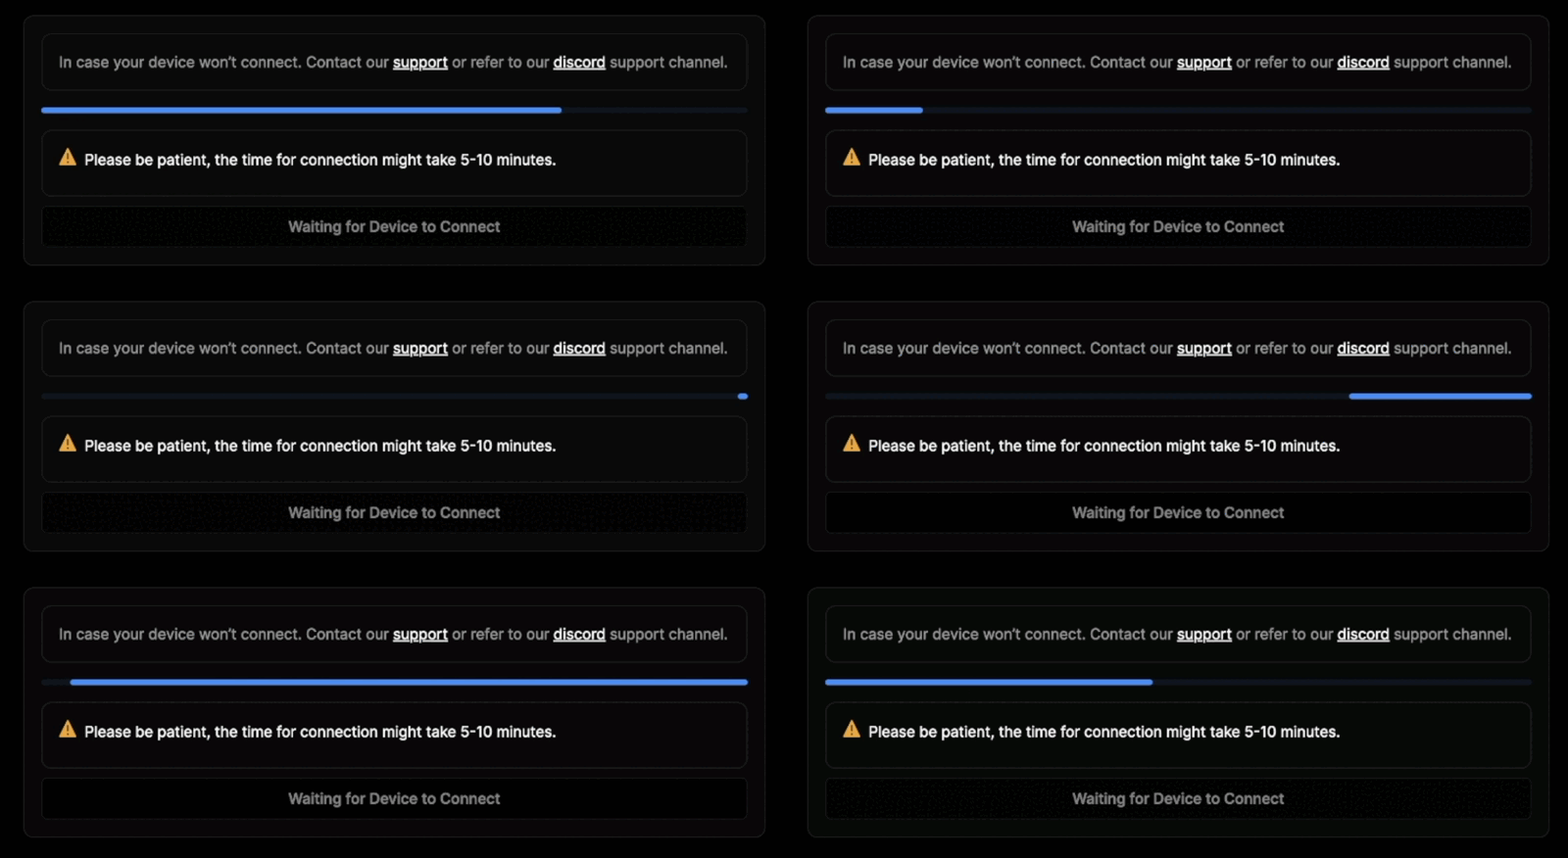
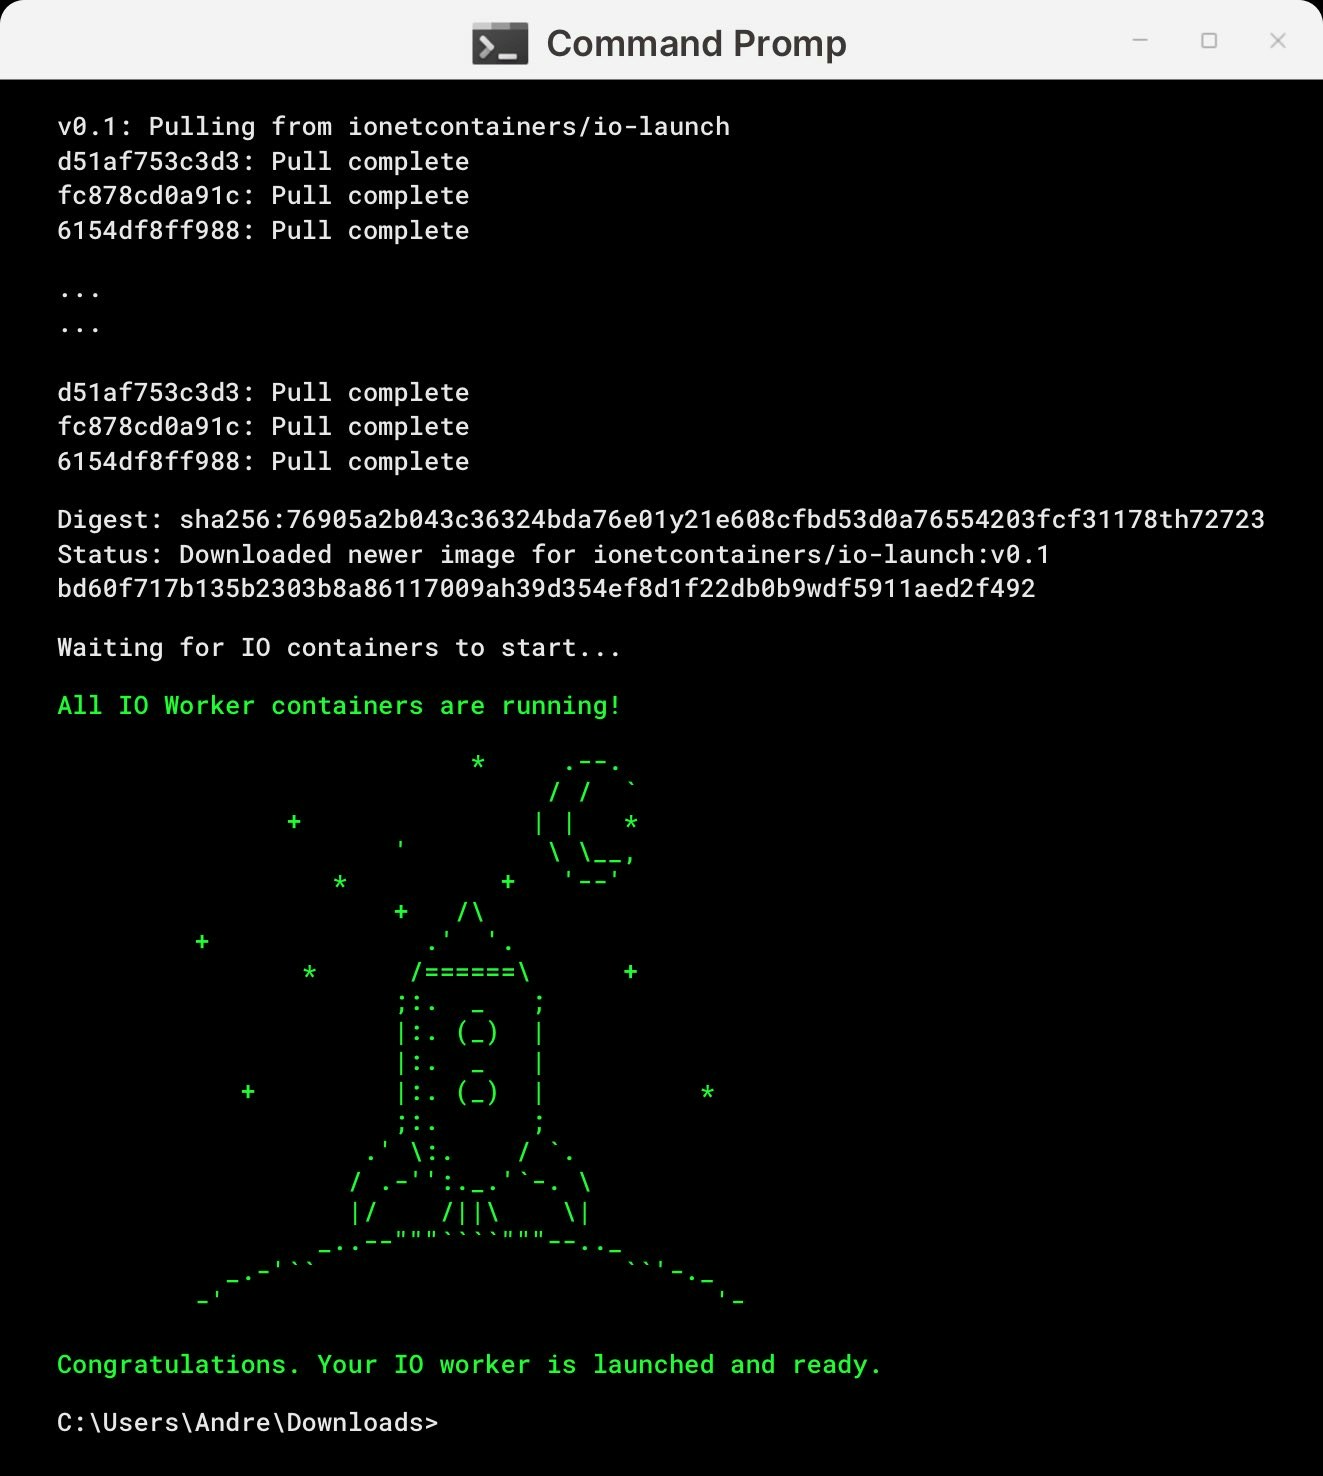
The IO Binary will installs all additional containers and images for your Docker. The process may take some time to complete as it installs additional packages for Docker. Please allow the installation process to finish.
Afterward, return to the browser to complete the installation.
You may need to wait for up to 10 minutes while the device checks and connects to the IO Ecosystem. If it doesn't connect, reach out to our Support ticket by logging into your [IO.Net account](https://worker.io.net).
Please disable power-saving mode when running your devices on IO Net. Power-saving mode can impair device performance, potentially leading to failure in PoW or being classified as not providing adequate computing power.
### Congratulations on Successfully Setting up Your First Worker.
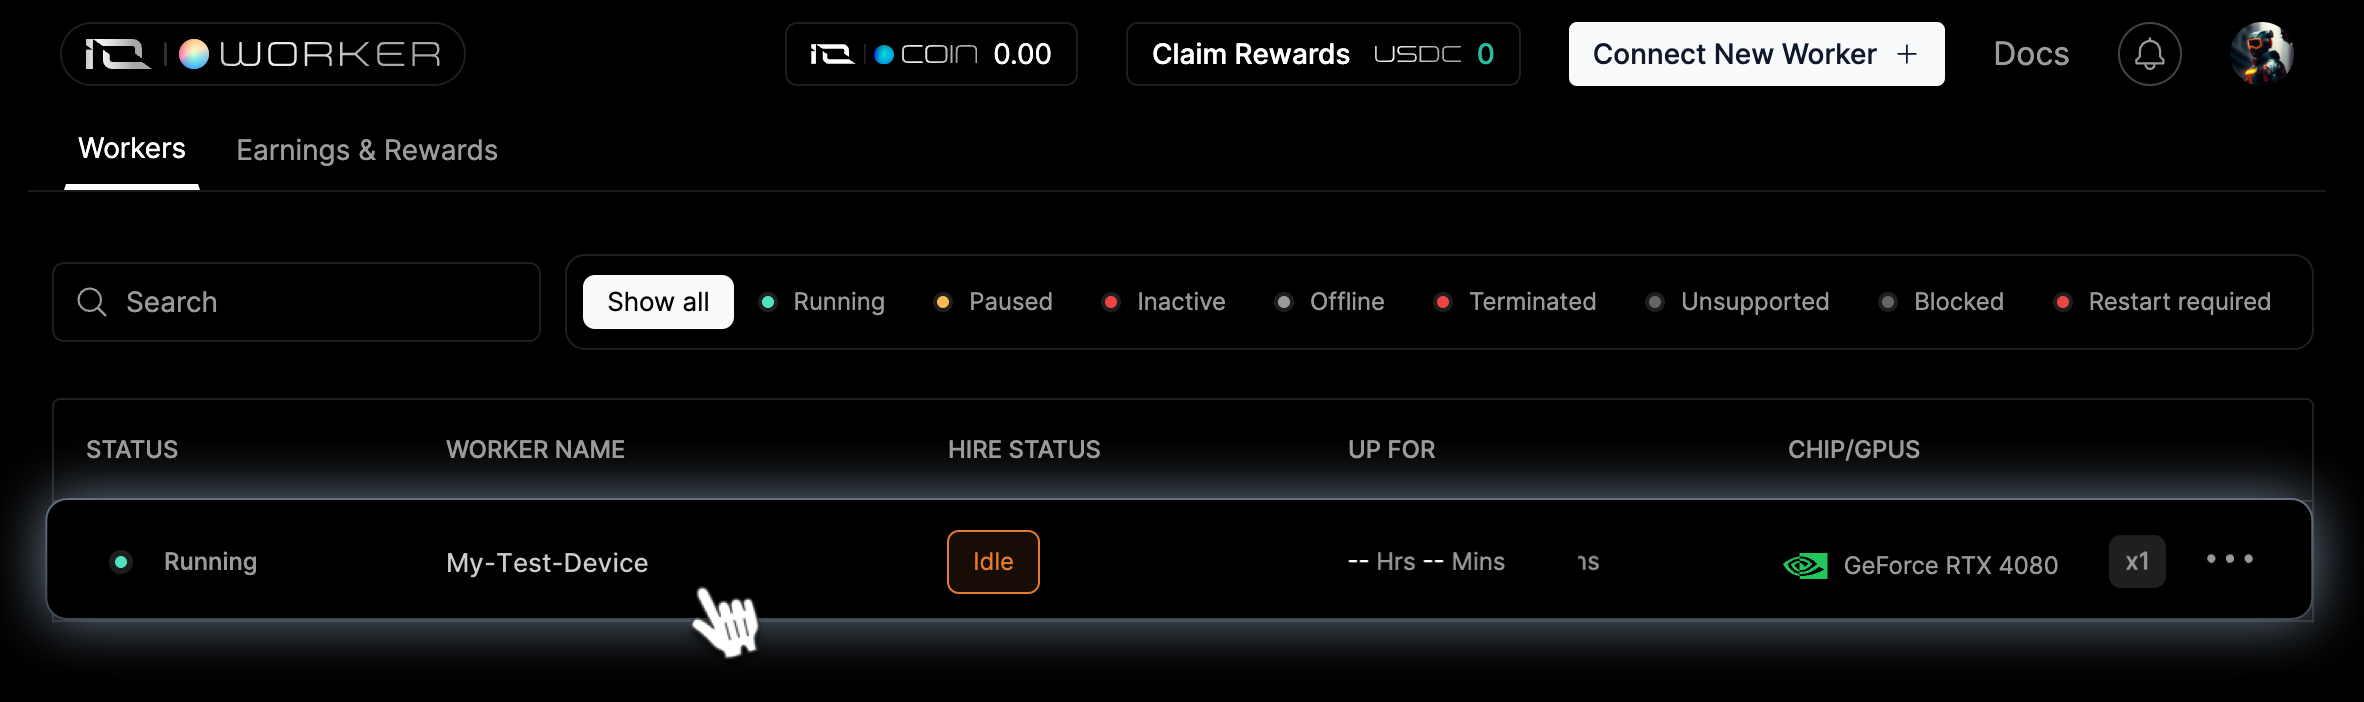
Now that your Worker has been successfully created and is running, you can track its status on the Workers page.
If you're having trouble installing the Worker, please refer to our [Windows Worker troubleshooting guide](/guides/workers/troubleshoot-windows-worker) or the [general Worker troubleshooting guide](/guides/workers/troubleshoot-worker-general). If the issue persists or you need further assistance, feel free to [check our knowledge base](https://support.io.net/en/support/home) for answers, and if you still need help, don’t hesitate to open a support ticket!
Be aware that you will be installing a 20GB size container. This contains all the packages needed to serve AI/ML apps. Everything happens inside the container, nothing within the container can access your filesystem.
 ```
io_net_launch_binary_windows.exe --token your-token-value
```
Tokens are valid for 12 months.
```
io_net_launch_binary_windows.exe --token your-token-value
```
Tokens are valid for 12 months.
 ### 1. From IO Elements Go to IO Worker
IO Elements serves as your new control panel for navigating the service efficiently. Click on **IO Worker** to delve deeper into its functionalities and features.
### 1. From IO Elements Go to IO Worker
IO Elements serves as your new control panel for navigating the service efficiently. Click on **IO Worker** to delve deeper into its functionalities and features.
 ### 2. Click "Connect New Worker" to Open the Wizard
If Workers have not been added, click Connect New Worker. If the screen is full of information, find the same button in the upper right corner.
### 2. Click "Connect New Worker" to Open the Wizard
If Workers have not been added, click Connect New Worker. If the screen is full of information, find the same button in the upper right corner.
 ### 3. Name Your Device
Click the "**Pencil**" icon to open the popup for editing the device name.
Please add a unique name for your device. We suggest a format such as: **My-Test-Device**
.
### 3. Name Your Device
Click the "**Pencil**" icon to open the popup for editing the device name.
Please add a unique name for your device. We suggest a format such as: **My-Test-Device**
.
 ### 4. Select Windows Operating System
Choose the Operating System of your device from MacOS, **Windows** or Ubuntu.
### 4. Select Windows Operating System
Choose the Operating System of your device from MacOS, **Windows** or Ubuntu.
 ### 5. Select Device Type
You should choose the device type based on your task. A video card is better suited for AI tasks, while a processor is more suitable for graphic rendering.
### 5. Select Device Type
You should choose the device type based on your task. A video card is better suited for AI tasks, while a processor is more suitable for graphic rendering.
 You can also verify whether your GPU or CPU is included in the list of devices supported by our service on the wizard page.
 1. Download and Install Desktop
  2. **Open IO Binary file into Terminal**
**Terminal** is a tool on your computer that allows you enter commands to tell the computer what to do. Instead of clicking on elements with a mouse, you write instructions, and the computer follows them. It's like talking directly to your computer using text.
* Click the **Start Menu** icon, then find and select the **Terminal** app from the popup menu.
2. **Open IO Binary file into Terminal**
**Terminal** is a tool on your computer that allows you enter commands to tell the computer what to do. Instead of clicking on elements with a mouse, you write instructions, and the computer follows them. It's like talking directly to your computer using text.
* Click the **Start Menu** icon, then find and select the **Terminal** app from the popup menu.
 * In the **Terminal**, navigate to the **Downloads** folder by typing the command to go to the folder with the IO Binary.
```
cd Downloads
```
* Next, copy the command from your new worker page to launch the IO Binary.
* In the **Terminal**, navigate to the **Downloads** folder by typing the command to go to the folder with the IO Binary.
```
cd Downloads
```
* Next, copy the command from your new worker page to launch the IO Binary.
 Then paste it into the terminal and press Enter to run it.
 ### 8. Authorize Your New Device
The
### 8. Authorize Your New Device
The 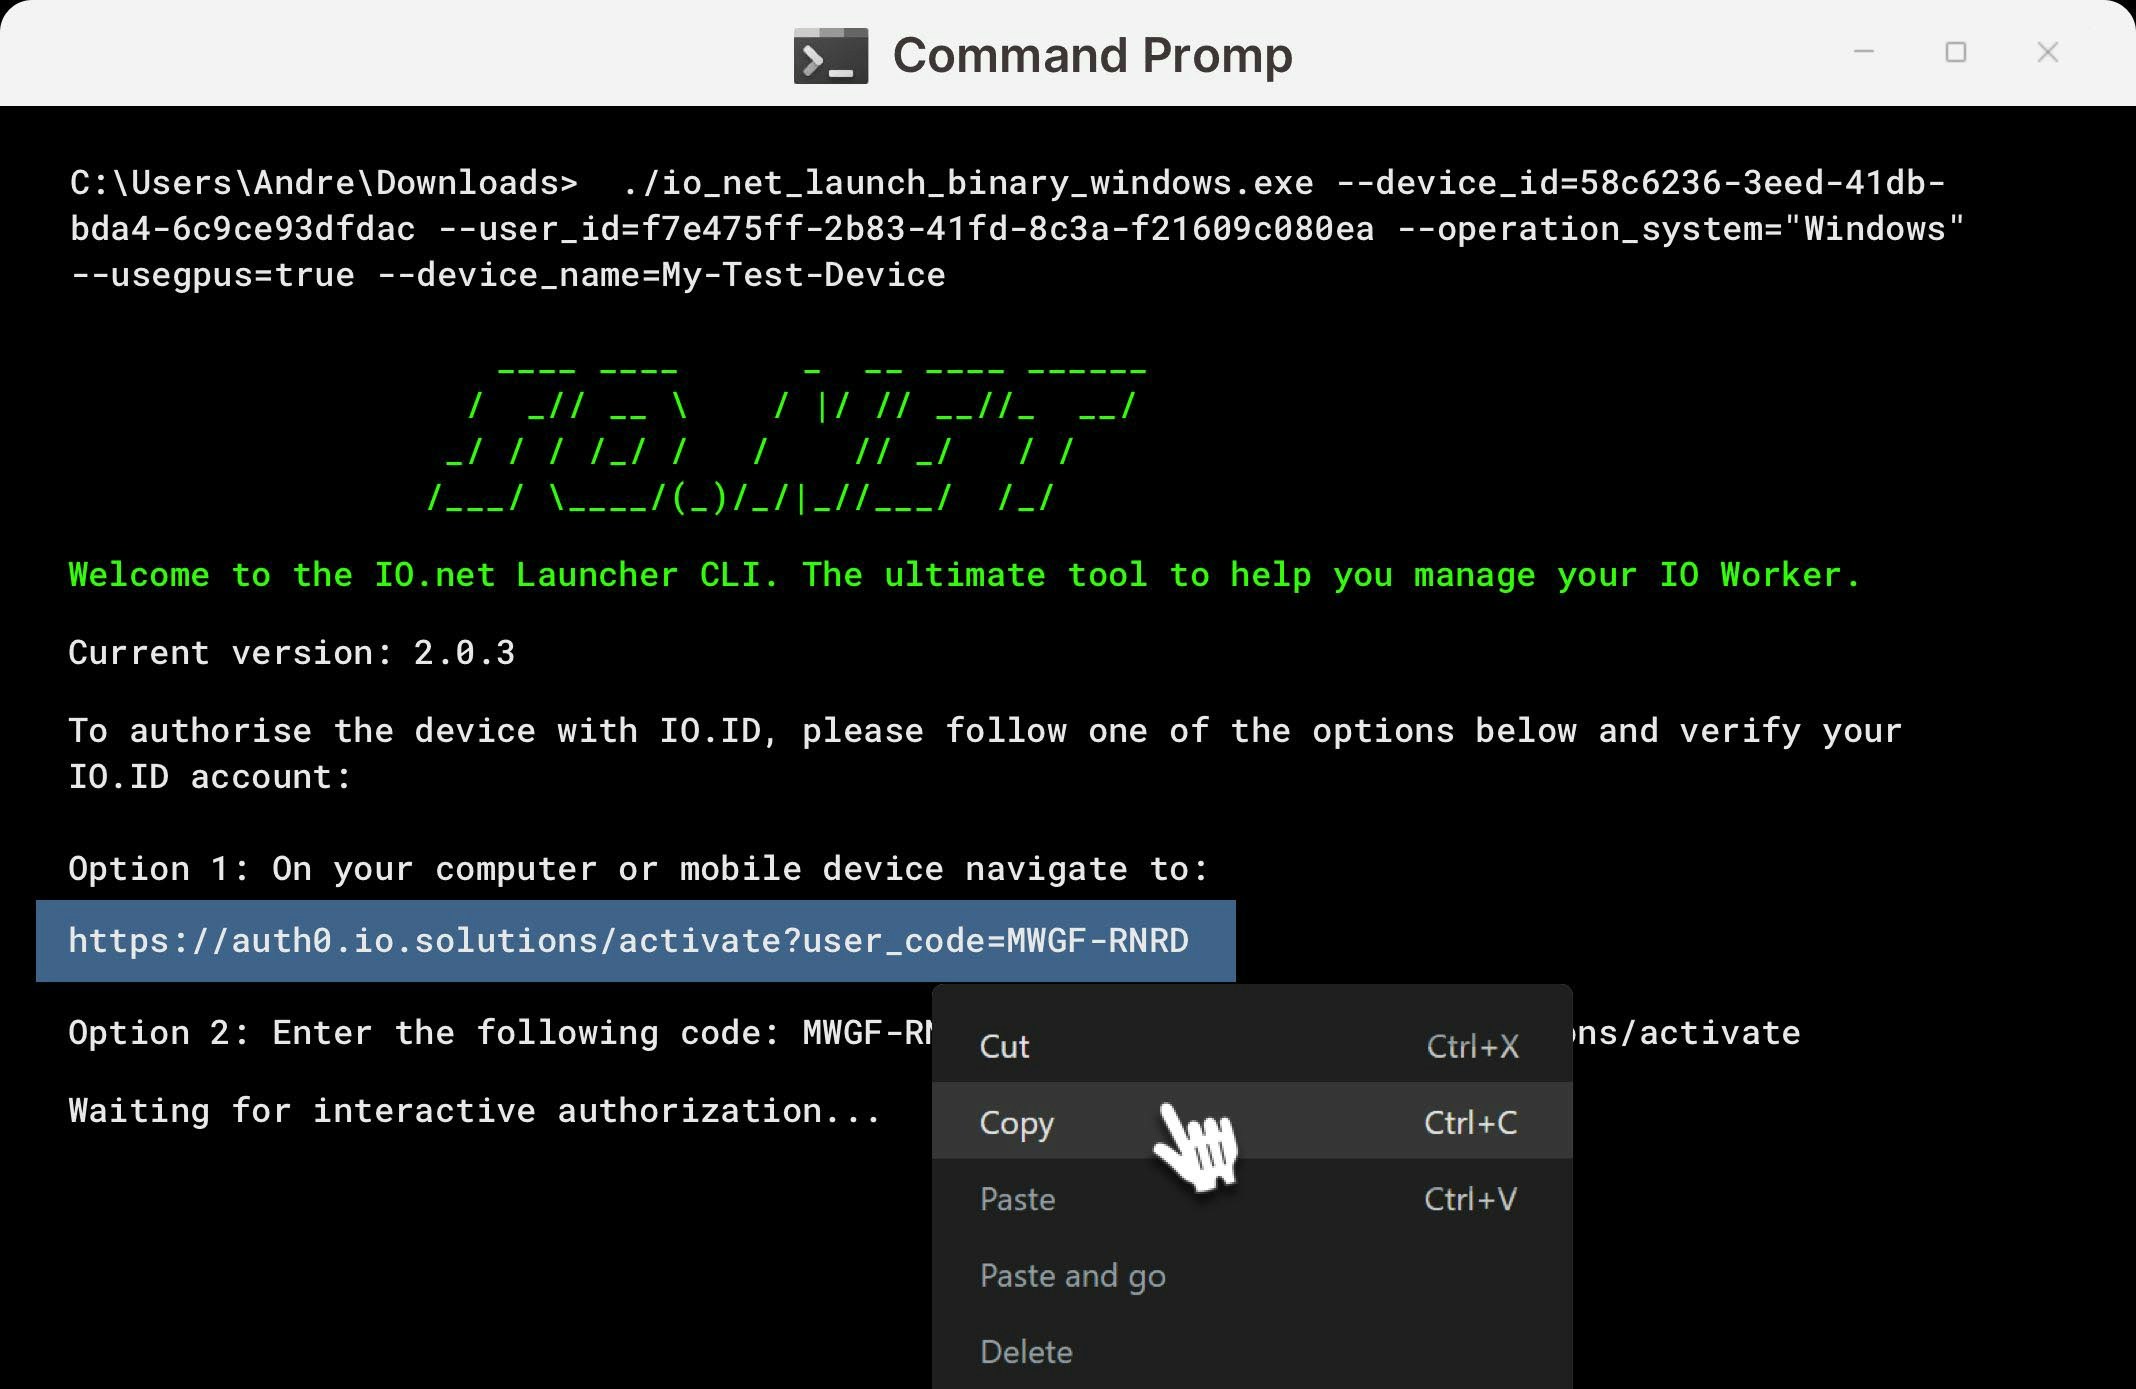 Paste it into your browser and confirm the action. After confirmation, the system will prompt you to log in.
 2. **Copy the Code from the Terminal**:
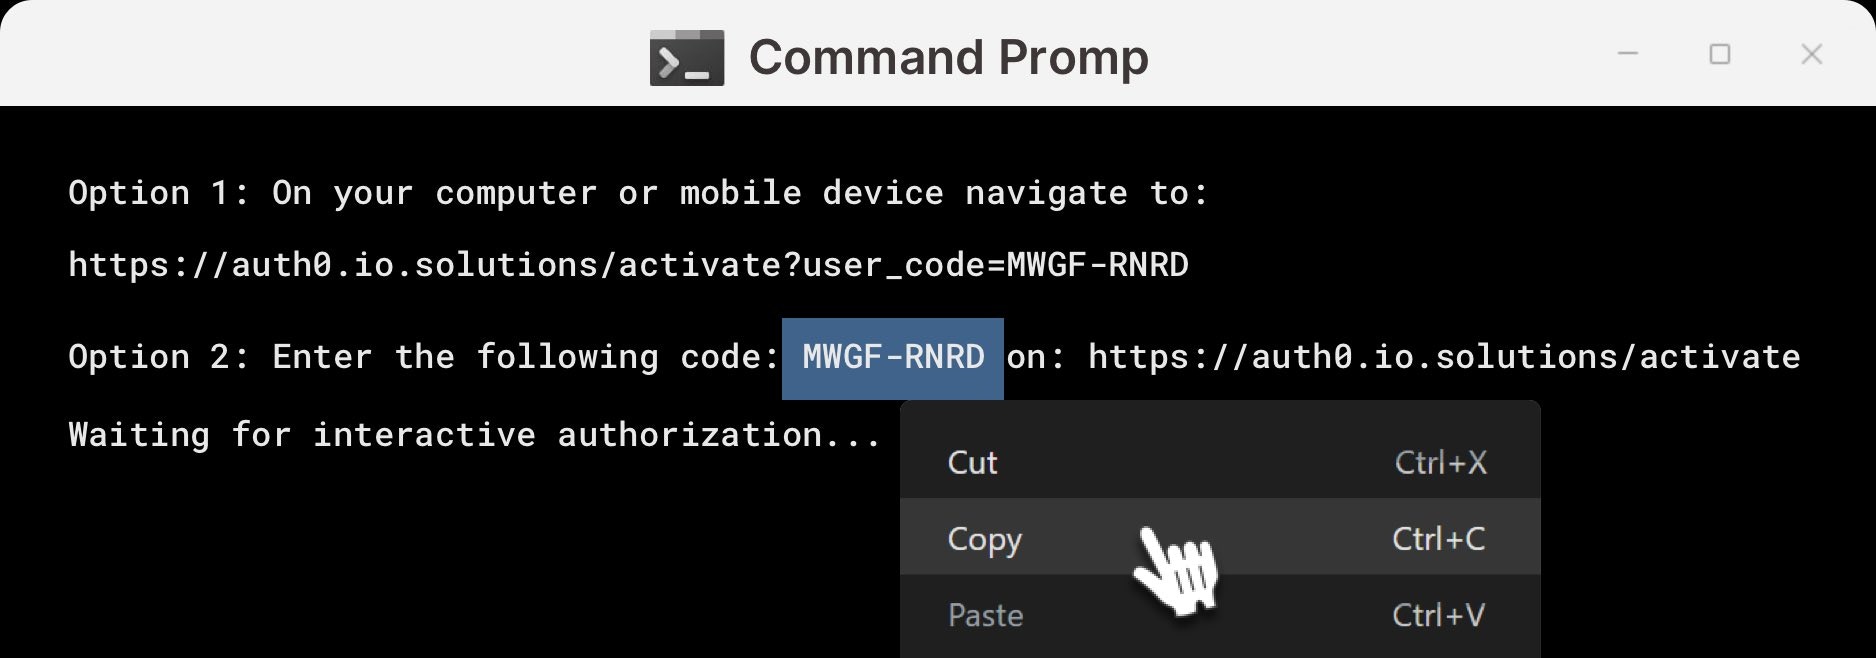 Enter this code on the page [https://auth0.io.solutions/activate](https://auth0.io.solutions/activate) to authorize the device. After it, the system will prompt you to log in.
 ### 11. Wait for Worker Connection to Complete
The IO Binary will installs all additional containers and images for your Docker. The process may take some time to complete as it installs additional packages for Docker. Please allow the installation process to finish.
### 11. Wait for Worker Connection to Complete
The IO Binary will installs all additional containers and images for your Docker. The process may take some time to complete as it installs additional packages for Docker. Please allow the installation process to finish.
 Afterward, return to the browser to complete the installation.
You may need to wait for up to 10 minutes while the device checks and connects to the IO Ecosystem. If it doesn't connect, reach out to our Support ticket by logging into your [IO.Net account](https://worker.io.net).
Afterward, return to the browser to complete the installation.
You may need to wait for up to 10 minutes while the device checks and connects to the IO Ecosystem. If it doesn't connect, reach out to our Support ticket by logging into your [IO.Net account](https://worker.io.net).